If you're looking to get more out of your garden in the UK, building a cold frame is one of the smartest and easiest projects you can tackle. Think of it as a mini-greenhouse: a simple, low-to-the-ground box with a clear lid that shields your plants from the worst of the British weather. It’s your ticket to sowing seeds weeks earlier and keeping your harvest going long after your neighbours have packed up their trowels for the winter.
Why a DIY Cold Frame is a UK Gardener's Best Friend
For anyone gardening in the UK, the weather is a constant, unpredictable challenge. A cold frame isn't just a nice-to-have; it's a strategic tool. It creates a sheltered microclimate that gives you that all-important head start in spring and lets you hang on to the last precious days of autumn. Suddenly, a frustratingly short growing season becomes a much longer, more fruitful affair.

This simple structure puts you back in control. It's the perfect place for hardening off tender seedlings that you've started indoors, or for protecting precious alpines from the relentless winter damp. And honestly, the satisfaction of building your own is a huge part of the appeal. You can make it the exact size and style you need, fitting it perfectly into your garden and your budget.
The Practical Perks for Your Plants
A cold frame is a weekend project that delivers long-term rewards. That small investment of time pays you back tenfold in bountiful harvests and healthier, stronger plants. The main benefits are pretty straightforward:
- A Longer Season: You can start sowing hardy annuals and veg like lettuces, radishes, and spinach as early as February.
- Weather Protection: It acts as a shield for vulnerable young plants against the harsh realities of British weather, from late frosts to torrential downpours.
- A Hardening-Off Headquarters: It's the perfect halfway house for seedlings started on a warm windowsill, letting them acclimatise to the great outdoors gradually and safely.
- An Overwintering Haven: It keeps hardy herbs, alpines, and dormant perennials snug and dry through our notoriously wet and miserable winters.
This level of control over your planting schedule is a real game-changer. For a deeper dive into timing your crops perfectly, check out our guide on when to grow vegetables here in the UK.
A cold frame acts like a personal bodyguard for your most vulnerable plants. It moderates temperature swings, keeps the worst of the weather at bay, and gives you a protected space to nurture seedlings until they're strong enough to face the garden on their own.
The Personal Satisfaction of Building it Yourself
Beyond all the practical gardening advantages, there's the simple, honest joy of making something useful with your own two hands. It's a trend that's really taken off across the UK. Back in 2022, consumer spending on home improvement hit an incredible £6.2 billion, with loads of homeowners planning even more DIY projects.
A cold frame DIY project connects you to your garden on a deeper level. It’s a functional, satisfying build that doesn’t demand expert-level carpentry skills, putting it well within reach for most of us. Trust me, that feeling of pride every time you lift the lid to see your seedlings thriving inside is a reward all on its own.
Picking the Right Cold Frame Design and Materials
Before you even think about dusting off the saw, let’s talk about which cold frame DIY project is the right one for your garden. The best design isn't a one-size-fits-all deal; it’s all about your available space, what you want to grow, and the look you’re going for. Getting this right from the start is the key to a successful build and, ultimately, a more productive garden.
Getting the structure right is especially important here in the UK. A huge 78% of us have a private garden, and a solid 62% are actively growing our own plants, according to the latest industry statistics. Cold frames, usually made from timber or aluminium, are a brilliant way to shield plants from our famously cold and wet weather while still letting you vent them easily in our milder climate.
Three Core Cold Frame Designs
Each of these designs has its own strengths. Have a good think about where your cold frame will live and how you'll use it before you commit to a plan.
- The Freestanding Frame: This is your classic, go-anywhere option. It’s essentially a standalone box with a hinged lid that you can pop wherever you get the best sun—on the patio, a gravel patch, or even right on top of a garden bed to warm the soil ahead of planting. Its biggest plus is its flexibility.
- The Lean-To Frame: If you're tight on space, a lean-to is a clever choice. It uses the side of your house, a shed, or a solid garden wall for its back, which immediately saves on materials. It also borrows a bit of warmth from the wall, which soaks up heat during the day and gently releases it overnight.
- The Simple Cloche: Less of a frame and more of a portable plant-saver. A cloche is perfect for protecting individual plants or short rows from a sudden frost. It can be as simple as a pane of glass propped on bricks or a small, moveable box you can lift on and off vulnerable seedlings.
Selecting Your Frame Materials
The body of your cold frame needs to be tough enough to handle whatever the British weather throws at it. For a DIY project, timber is a fantastic choice—it's easy to work with and a great natural insulator.
When you're choosing wood, go for something that's naturally resistant to rot. Cedar and larch are top-tier choices, though they can be pricier. Treated pine is a more wallet-friendly alternative, but make sure it’s "pressure-treated" and specifically marked as safe for garden use, particularly if you’re growing edibles nearby. If you want something more rustic and permanent, reclaimed bricks or breeze blocks can form a solid base, but you obviously lose the portability. Our guide on the best wood for outdoor furniture has some great insights that are just as relevant here.
Remember, the main job of the frame's material is insulation. A thicker timber frame will hold onto the day's warmth for longer into those chilly nights, giving your plants a much more stable environment to grow in.
Choosing the Best Glazing for the UK Climate
The lid, or "light," is the most important part of your cold frame. The material you pick here will make all the difference to heat retention, how much light gets through, and overall safety.
The choice really comes down to balancing insulation, durability, and your budget. Here’s a quick rundown of the most common options.
Glazing Material Comparison for UK Cold Frames
For most UK gardens, twin-wall polycarbonate is the best all-rounder. It offers superior insulation for our cooler climate and is much safer to handle, especially if you have kids or pets around.
Here’s a closer look at the top contenders:
Toughened Glass
This is the traditionalist's choice, giving you unbeatable clarity and light. It's heavy, which is a bonus in windy spots, but it's also the most fragile and expensive option. If it does break, it crumbles into small, relatively harmless cubes instead of dangerous shards.
Twin-Wall Polycarbonate
I'd argue this is the best all-round material for a UK cold frame. It's essentially two sheets of plastic with an air channel in between, which provides brilliant insulation—much better than a single pane of glass. It’s also incredibly lightweight, almost impossible to shatter, and it diffuses sunlight, which stops delicate seedlings from getting scorched on a surprisingly sunny day.
Upcycled Windows
This is a brilliant, sustainable option that can save you a bundle. Building your frame to fit an old window you've found for free or picked up cheaply is a fantastic project. You get the crystal-clear view of glass without the hefty price tag. Just be extra careful when handling older panes, as they’re unlikely to be safety glass.
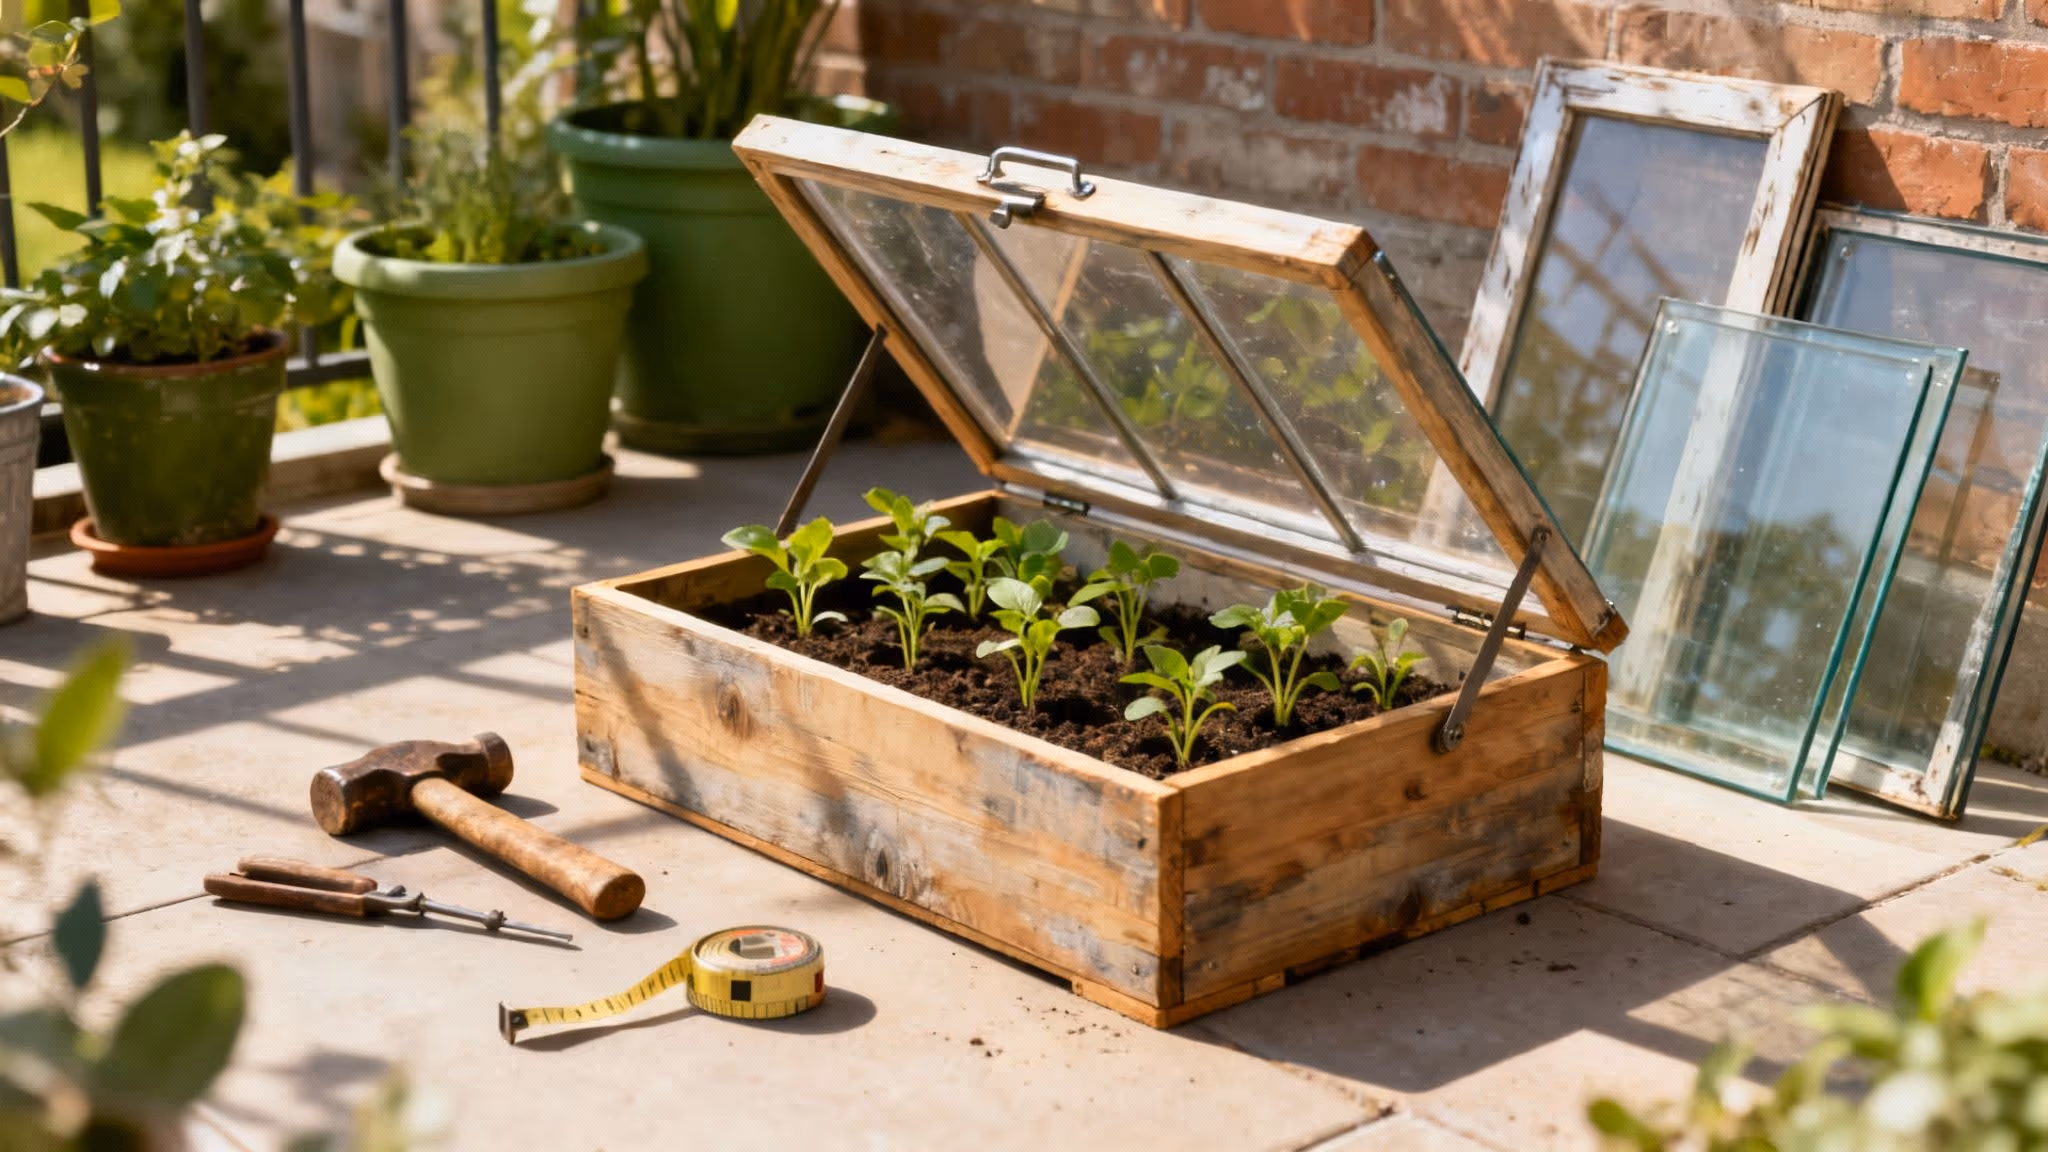
Building Your Freestanding Wooden Cold Frame
This is where the magic happens – turning a pile of timber and a good idea into a genuinely useful garden asset. There's nothing quite as satisfying as building something yourself, and this guide will walk you through creating a classic, freestanding cold frame. We’ll cover everything from picking the right timber to the final screw, focusing on practical techniques that will give you a sturdy, long-lasting frame.

I’ve broken the whole process down into manageable chunks, making it a perfect weekend project. Even if you’re not a seasoned woodworker, these instructions are designed to be straightforward, so you can build with confidence.
Gathering Your Tools and Materials
Before you even think about making the first cut, get everything organised. A clear workspace and having all your tools and materials to hand makes the whole job much smoother and, frankly, more enjoyable. You don't need a fancy workshop; a bit of clear space on the patio or in the garage is perfectly fine.
Here’s a rundown of what you’ll likely need. Don't be put off if you don't own every tool on the list – many can be hired, or you can often get by with a bit of ingenuity.
Essential Tools List
- Tape Measure: Non-negotiable for getting your cuts right. The old saying "measure twice, cut once" is a motto for a reason!
- Pencil: For marking up your cuts.
- Combination Square: Incredibly useful for making sure your corners and markings are a perfect 90 degrees.
- Saw: A basic hand saw will do the job, but a circular or mitre saw will make life much easier, giving you cleaner, quicker, and more accurate cuts, especially for the angled sides.
- Cordless Drill/Driver: A real time and wrist-saver. Make sure you have a good set of drill and driver bits.
- Clamps: A couple of G-clamps or quick-release clamps are like having an extra pair of hands, holding pieces steady while you screw them together.
- Safety Gear: Don't skip this. Always wear safety glasses. Gloves and a dust mask are also a good idea, particularly when sawing treated timber.
Materials for a Standard Frame (e.g., 120cm x 60cm)
- Frame Timber: Pressure-treated decking or gravel boards are a great choice. They're tough, stand up to the weather, and won't break the bank. For a typical build, you'll need around 8 metres of 150mm x 22mm board.
- Corner Supports: A length of treated 50mm x 50mm timber. This is the secret to creating really strong internal corner posts.
- Lid Frame Timber: Treated 50mm x 25mm timber battens are perfect for a lid frame that’s both light and strong.
- Glazing: Your chosen material – twin-wall polycarbonate, toughened glass, or maybe an old window you've salvaged.
- Screws: A box of exterior-grade wood screws (around 50mm long) is a must to stop rust in its tracks.
- Hinges: Two robust, exterior-grade T-hinges or butt hinges.
- Handle: A simple gate handle will do the trick.
- Optional Extras: A stay arm or a bit of chain to hold the lid open, and a tube of silicone sealant for waterproofing the glazing.
Preparing and Cutting Your Timber
With everything gathered, it’s time to start cutting. A clear cutting list helps you get the most out of your timber and ensures everything fits together nicely. For our example frame (120cm long x 60cm deep), we’re going for a sloped top to let rain run off and catch as much sun as possible.
This just means the back panel needs to be taller than the front. A height of 30cm at the back sloping down to 20cm at the front is a really practical size.
Example Cutting List
- Back Panel: Two pieces of 150mm board, both cut to 120cm.
- Front Panel: One piece of 150mm board at 120cm. A second piece will need to be 'ripped' (cut lengthwise) down to 5cm high, also at 120cm.
- Side Panels: Two pieces of 150mm board at 60cm, plus two more pieces that will need an angled cut, going from 15cm down to 5cm, to create the slope.
- Corner Supports: Four pieces of 50x50mm timber, each cut to the full height of the back panel (30cm).
Pro Tip: The easiest way to cut the angled side pieces is to lay your two 60cm boards together. Mark 30cm high on one end and 20cm on the other, then use a straight edge to draw a diagonal line connecting the marks. That line is your perfect guide for cutting.
Once all your pieces are cut, give any rough edges a quick sand. It’s not just about looks; it stops you getting splinters and helps any paint or stain you apply later to adhere better.
Assembling the Main Box Frame
This is the fun part – seeing it all come together. We're going to build the box using internal corner supports. It’s a simple but very strong method that also helps keep everything perfectly square.
Start by laying one of your 120cm back panels flat. Place a 30cm corner support flush against the end, using your square to check it's a perfect right angle. Drill pilot holes through the panel into the support post (this stops the wood splitting) and then pop in two or three screws. Do the same at the other end.
Now, fix the second back panel on top of the first, creating your solid 30cm high back wall. You should now have a single back piece with a sturdy post at each end. Next, attach your side panels to these posts, again drilling pilot holes before you drive the screws home. You’ll see the box shape starting to emerge.
Finally, bring the front panel pieces into place and screw them to the front of the corner supports. You should be left with a solid, four-sided box with a gentle slope. This internal bracing is much stronger than just screwing the board edges together and will help stop the frame from warping over time.
Constructing and Attaching the Lid
The lid, sometimes called the 'light', is the key to trapping the sun's warmth. It needs to be tough enough to handle the British weather but light enough for you to lift easily. Timber battens are ideal for the frame.
Build a simple rectangular frame using your 50x25mm battens. Make it slightly larger than the top of your box – an overhang of about 2cm all around is perfect for keeping rain out. You can join the corners with simple butt joints and screws. For a bit of extra strength, especially on a larger lid, add a central cross-brace. This will also help support the glazing panel.
With the frame made, it’s time to add the glazing. If you’re using polycarbonate, you can cut it to size with a fine-toothed saw and fix it to the top of the frame with screws and washers. For a properly weatherproof seal, run a bead of clear silicone where the glazing meets the wood.
Now, attach the finished lid to the taller back panel of the box with your two hinges. Placing them about 15-20cm in from each end gives good balance. To finish it off, screw a handle to the front of the lid and fit a simple stay arm or a chain and hook so you can prop it open for ventilation on sunny days – this is absolutely essential.
Finishing and Protecting Your Woodwork
Your cold frame is now built, but one final step will make all the difference to how long it lasts. Even pressure-treated timber will thank you for an extra layer of protection against the damp.
Applying a good wood preservative, stain, or an exterior paint will seal the wood grain and stop moisture from getting in. Pay special attention to the cut ends of the timber, as this is where rot is most likely to start. A clear wood oil gives a lovely natural finish, while a splash of paint can turn your cold frame into a real garden feature. If you fancy painting it, our detailed guide on how to paint wood covers everything you need for a durable, great-looking finish.
Let whatever you’ve applied dry and cure properly according to the instructions before you put any plants inside. This makes sure no chemicals can leach into the soil. With that done, your freestanding cold frame is ready for duty, poised to help you get a head start on the growing season for many years to come.
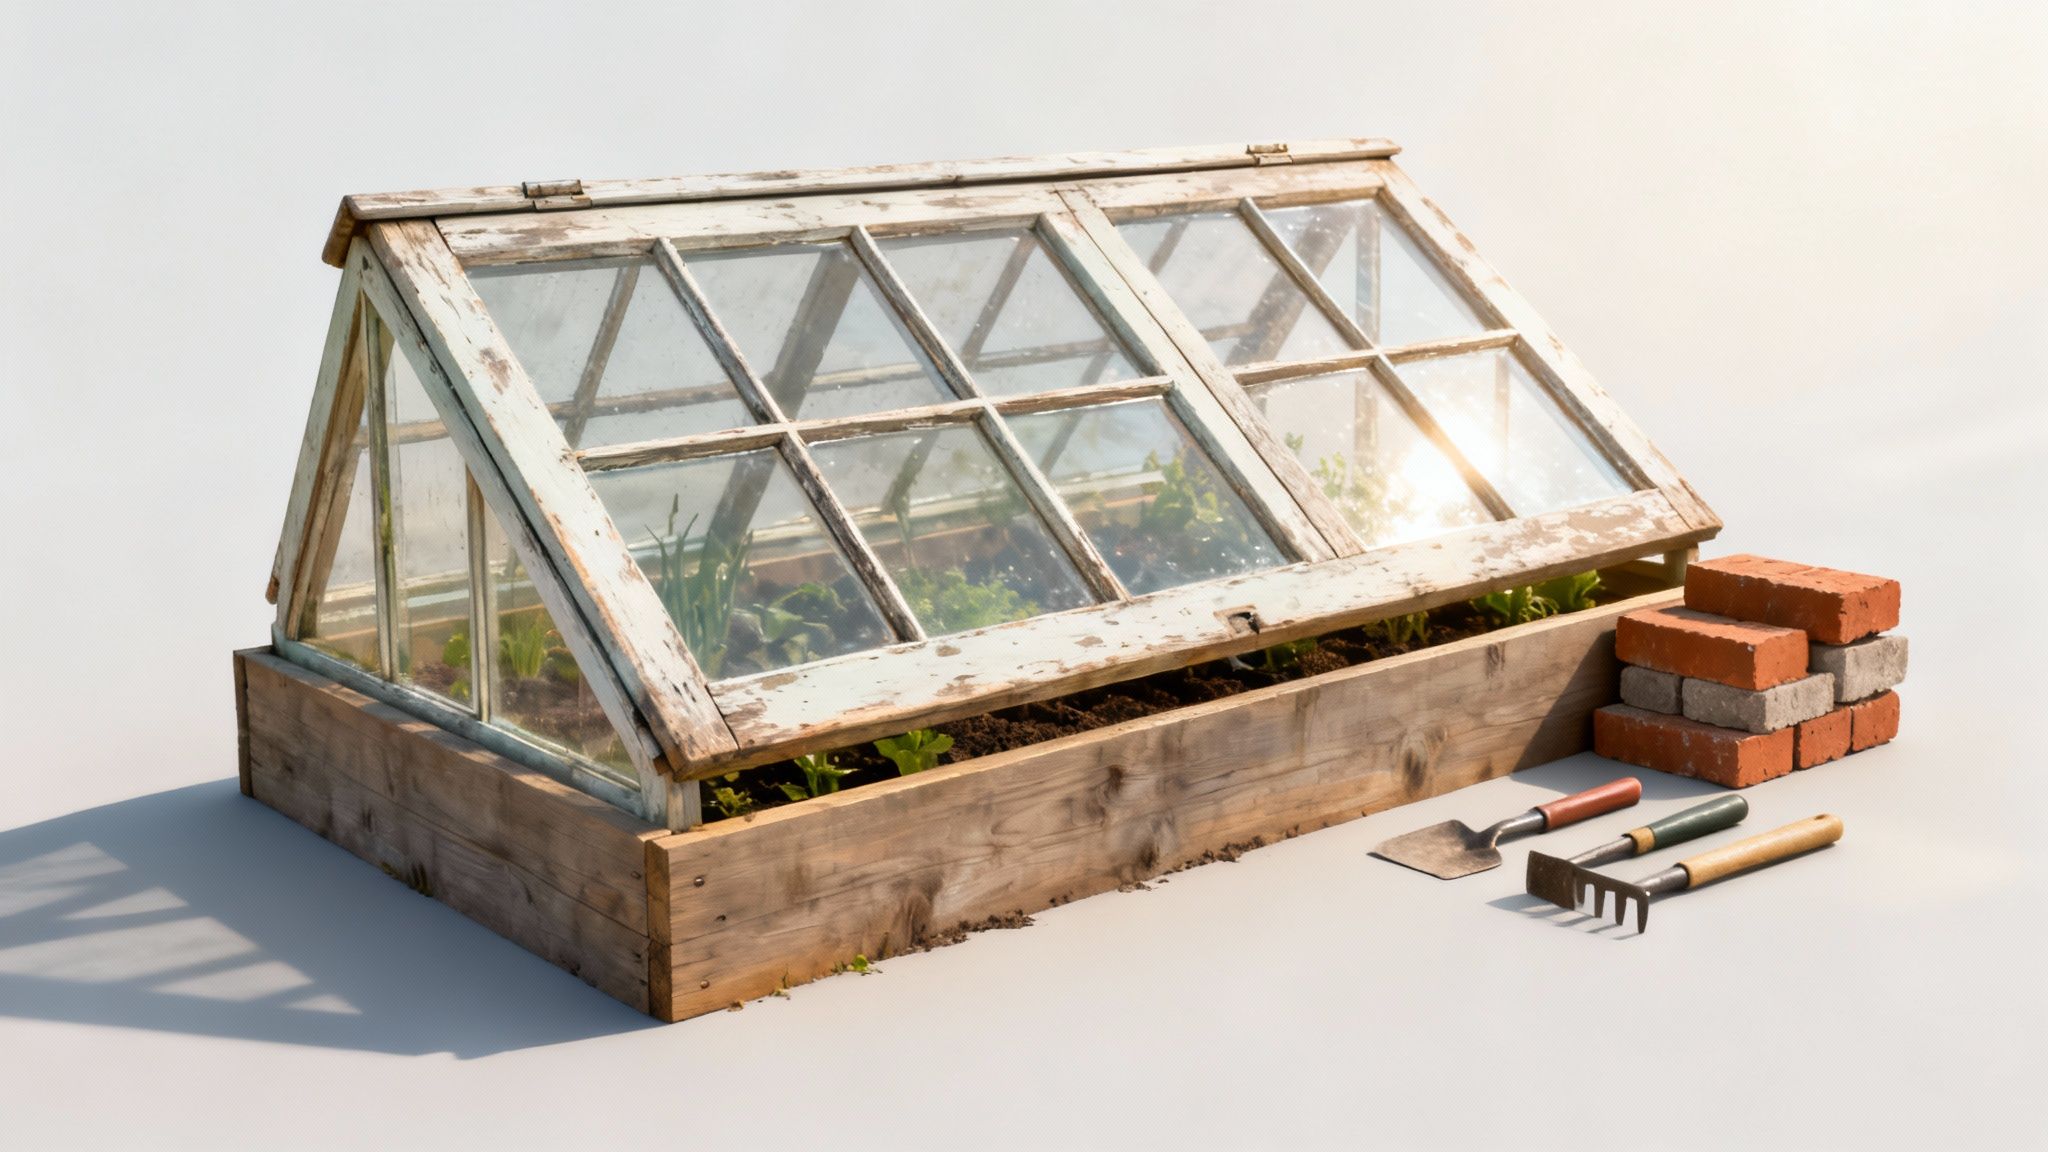
Creative Upcycling and Budget-Friendly Build Ideas
A great cold frame doesn’t have to begin with a trip to the timber merchant. In fact, some of the most effective and charming designs I've seen have come from a bit of clever salvaging, giving old materials a new lease of life in the garden. This approach is not only lighter on the wallet but also a brilliantly sustainable way to get building.
So many items destined for the skip can be transformed into a fantastic cold frame diy project. With a little imagination, you can build an incredibly useful bit of kit for next to nothing. It’s a win-win for eco-conscious gardeners and anyone looking to stretch their budget.
Sourcing Your Upcycled Materials
The heart of any upcycled cold frame is usually its lid, and old windows are the undisputed champion here. They offer brilliant light transmission and a rustic charm that’s hard to replicate with brand-new materials.
Keep your eyes peeled for these prime candidates:
- Old Wooden Windows: Single-pane sash windows are perfect. Their existing frame gives you a ready-made structure for the lid.
- Aluminium-Framed Windows or Shower Doors: Don't dismiss these! While less traditional, they're lightweight, tough, and completely weatherproof.
- Solid Polycarbonate Sheets: Offcuts from roofing jobs or old conservatory panels often pop up for free or for very little money online.
Finding these treasures is half the fun. Scout local online marketplaces, pop down to a car boot sale, and have a good rummage in reclamation yards. And don't be afraid to ask friends or neighbours who are renovating – you might just save them a trip to the tip.
Building with Reclaimed Items
Once you've got your "glass," the rest of the build is simply about creating a box to fit it. This is where you can get really inventive with whatever you have lying around.
Old decking boards, dismantled pallets, and even leftover bricks or breeze blocks can make a wonderfully sturdy base for your cold frame. If you're working with reclaimed timber, you'll find plenty of inspiration in our journal exploring various pallet wood projects, with ideas you can easily adapt for your build.
A Quick Word on Safety: When upcycling, always check old window frames for structural soundness and wear gloves when handling glass. If you suspect the paint on a very old frame is flaking, it could contain lead, so it's best to sand it back carefully outdoors while wearing a mask.
Prepping and Assembling Your Finds
Getting your salvaged materials properly prepped is the key to a frame that lasts for years. For a wooden window, a good scrub, a light sanding, and a fresh coat of garden-safe paint or wood preservative will do wonders to protect it from the British weather.
When it comes to putting it all together, simplicity is your best friend.
First, you'll want to build the box. Just construct a simple four-sided frame that's slightly smaller than your window lid. This creates a small lip that helps keep the rain out.
Next, it's time to attach the lid. Use a pair of sturdy, exterior-grade hinges to fix the window to the tallest side of your box frame.
Finally, add the finishing touches. A simple handle screwed onto the front makes lifting easy, and you’ll need a chain or a prop stick to hold the lid open for ventilation on warmer days.
Following this approach lets you build a truly custom cold frame that's perfectly suited to your unique, upcycled finds. It's an immensely rewarding project that proves a productive garden really doesn't need to cost the earth.
How to Use Your Cold Frame All Year Round in the UK
Right, so you’ve built your cold frame and it’s sitting proudly in the garden. What now? The real magic of this simple box is in how you use it through the seasons. Think of it less as a static object and more as your secret weapon against our notoriously unpredictable British weather.
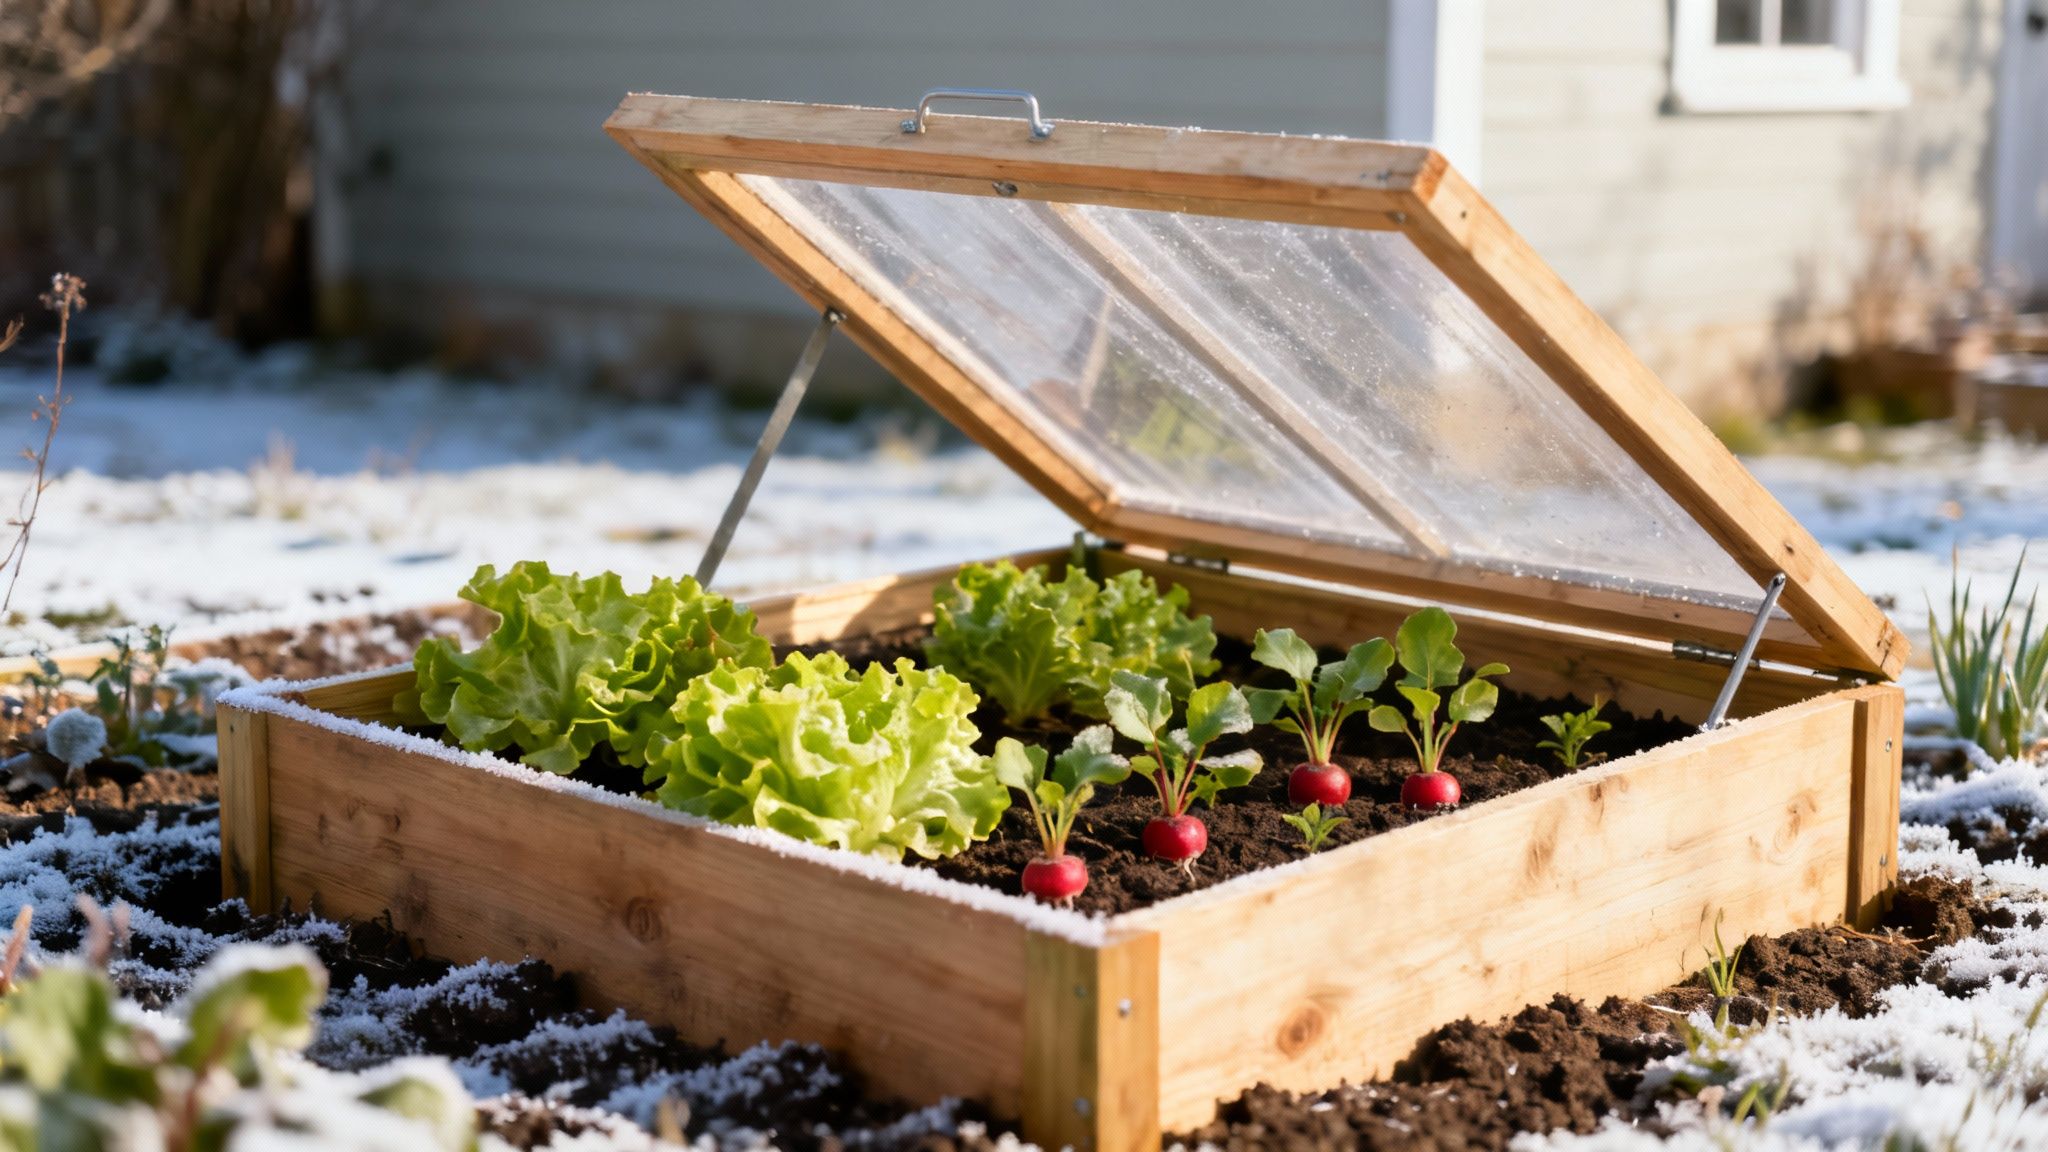
From getting a ridiculously early start on your spring crops to protecting cherished plants from autumn's first frost, your cold frame is a true workhorse. The key is knowing what it does best in each season and getting the hang of one crucial skill: ventilation.
Late Winter to Early Spring: Get a Head Start
This is prime time for a cold frame. While the rest of the garden is still asleep, yours can be a hive of activity.
- Early Sowing: You can sow hardy veg directly into the soil inside the frame from late February onwards. Think hardy lettuces ('Winter Gem' is a great one), radishes, spring onions, spinach, and even some early carrot varieties.
- Hardening Off: The frame is the perfect halfway house for tender seedlings grown on your windowsill. Before you plant them out, give them a week or two in the cold frame. Just open the lid for longer periods each day to gently acclimatise them to the great outdoors.
The Art of Ventilation
If you learn one thing, make it this: you have to manage ventilation. It's the most important part of using a cold frame successfully. Even on a cool but sunny day in March, the temperature inside that box can rocket, and you'll come back to find you’ve cooked your delicate seedlings.
Get into a daily routine. Every morning, prop the lid open with a small block of wood. This lets the air circulate and stops things from getting too hot. Then, as the afternoon starts to cool, close it up to trap that precious warmth for the night ahead. This simple habit prevents a world of pain, from fungal diseases to heat stress.
A cold frame breathes with the day. Opening it in the morning is like an exhale, releasing excess heat and moisture. Closing it in the evening is an inhale, drawing in and holding onto the day's warmth to protect against the cold night.
Summer: From Nursery to Salad Bar
You might think a cold frame is a bit pointless in summer, but not at all. Prop the lid wide open, or even take it off completely, and it becomes a brilliant nursery. It's a great spot for raising young plants that need a bit of shelter from either scorching sun or those sudden, torrential downpours.
It's also the perfect place for crops that love heat but hate wind, like aubergines or peppers. The walls of the frame create a sheltered microclimate that can make all the difference between a sad-looking plant and a brilliant harvest.
Autumn and Winter: Extending the Season
As the days get shorter and the chill returns, your cold frame gears up for its second main role: a season extender and winter sanctuary.
- Extend Your Harvest: Got pots of chillies or a few late tomatoes still ripening? Move them into the frame to protect them from the first frosts and give them a chance to finish.
- Overwintering: It provides the perfect dry, sheltered spot for overwintering hardy herbs like rosemary and thyme, or alpine plants that really hate our soggy British winters. Keeping the wet off their crowns is often the key to their survival.
To give you a clearer idea, here’s a quick-reference calendar to help you plan your cold frame activities throughout the year.
Seasonal Planting Calendar for a UK Cold Frame
This calendar is just a starting point, of course. The real joy comes from experimenting and seeing what works best in your own garden.
Learning how to work with the seasons turns your cold frame diy project from a simple wooden box into one of the most valuable tools you own. For a deeper dive into protecting your garden when the weather turns, check out our guide on protecting plants in winter and keep your garden happy all year long.
Common Questions About DIY Cold Frames
Even the most straightforward DIY cold frame project can bring up a few questions. To get your build off to a flying start, let's tackle some of the common things that UK gardeners wonder about when they first put their new structure to use.
Getting these little details right can make a world of difference to your plants and how well your frame performs.
What’s the Best Position for a Cold Frame?
The perfect spot is south-facing, where it will catch at least six hours of sun, especially during the crucial spring and autumn months. Just as important is finding a place sheltered from harsh, cold winds, as these can whip away heat and drop the internal temperature in no time.
Here's a great tip from experience: placing your frame against a house or garden wall gives you a real advantage. The brickwork soaks up the sun's warmth all day and then gently radiates it back overnight. This provides a brilliant thermal boost and extra protection from a sharp frost.
The secret to a high-performing cold frame isn’t just its construction; it’s the placement. Think of it as real estate for plants—location is everything. A sheltered, sunny spot is the difference between thriving seedlings and struggling ones.
How Do I Stop My Plants from Overheating?
Ventilation. It’s absolutely everything. On any sunny day, even a chilly one in the middle of winter, the temperature inside a closed cold frame can skyrocket, quickly scorching or even killing your tender plants. Honestly, this is the single most common mistake new cold frame users make.
You need to get into the daily habit of propping the lid open in the morning with a small block of wood to let the air circulate. On properly warm days, you might even need to open it fully. If you're often out during the day or just a bit forgetful, an automatic vent opener is a fantastic, low-cost investment that takes care of this vital job for you.
Should I Insulate My Cold Frame for a UK Winter?
For most of the UK, a well-built cold frame will be perfectly fine for overwintering hardy plants and protecting early sowings. That said, if a particularly harsh cold snap is forecast, adding an extra layer for peace of mind is a very sensible move.
It’s easy enough to just drape some horticultural fleece or even an old blanket over the top at night to trap that little bit more warmth. For a more permanent boost, you could line the inside walls with horticultural bubble wrap – it provides a decent amount of insulation without blocking too much of that precious winter light.


