Knowing how to prune lavender is simpler than you might think. A strategic annual trim is all it takes to stop the plant from becoming woody and sparse, encouraging a flush of new growth and those gorgeous, fragrant flowers we all love. Honestly, this one task is the secret to a healthy, long-lived lavender shrub.
Why Pruning Lavender Is a Gardener's Best Kept Secret
I get it. Many gardeners feel a bit nervous taking the shears to their beautiful lavender, worried they might do more harm than good. But trust me, this yearly haircut is the single most important thing you can do to keep your lavender thriving for years, especially with the UK's often damp climate.
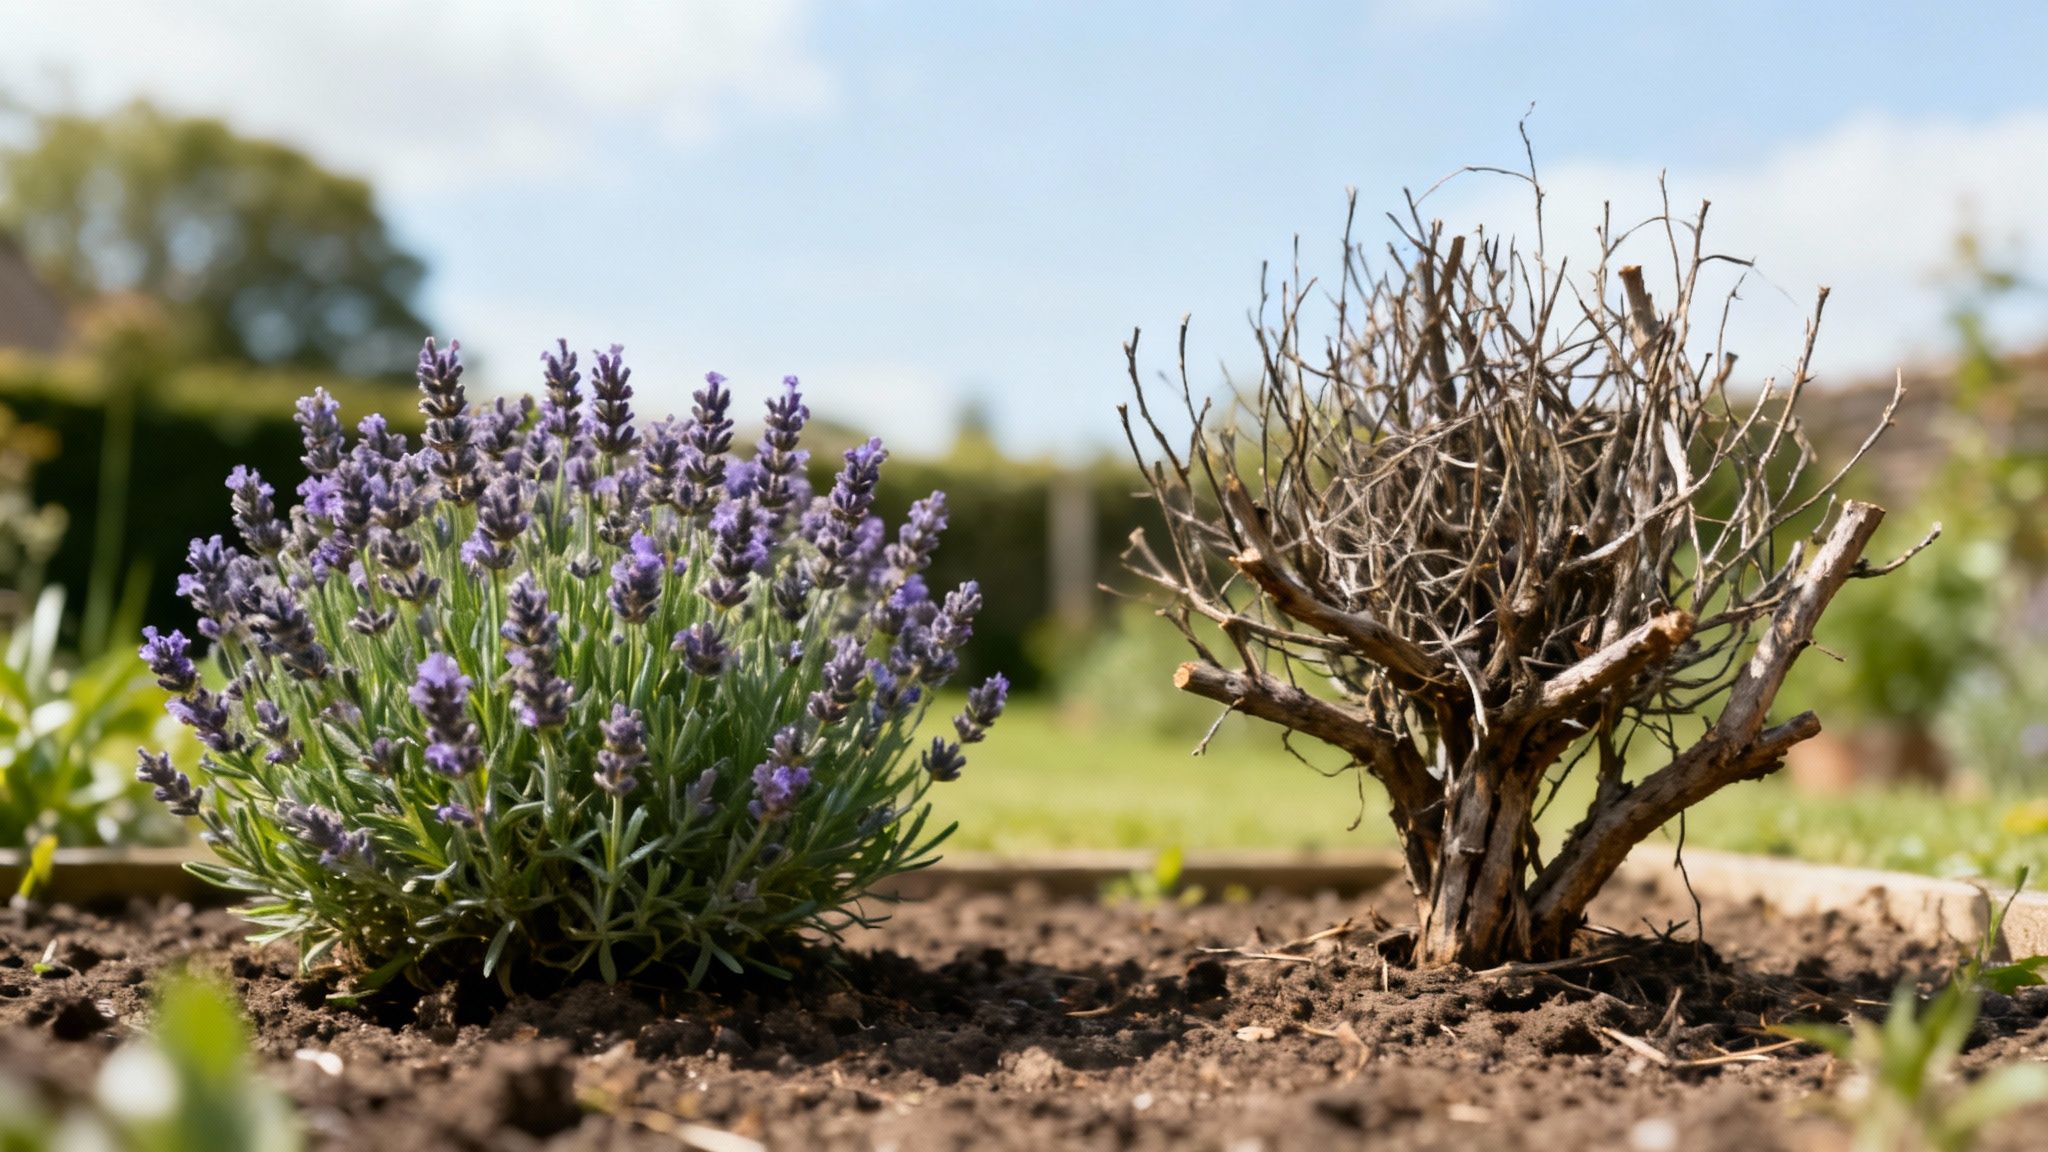
Left to its own devices, lavender has a natural habit of getting "leggy." This is where it develops long, woody stems at the base with just a little tuft of green growth at the very tips. A woody plant not only produces fewer flowers but is also much more likely to split open under the weight of heavy rain or a blanket of snow.
Boost Blooms and Extend its Life
A good, confident trim encourages the plant to put out a whole host of new, flexible green stems. These fresh stems are precisely where next season's fragrant flowers will appear, giving you a much more impressive and vibrant display.
This isn't just about looking good; it's about the plant's long-term health. From my experience and talking to other UK growers, a well-pruned lavender plant can flourish for a good 10–15 years. In contrast, neglected ones often start to look tired and decline after just five. You only need to look at large-scale lavender farms, some managing over half a million plants, to see how vital this practice is to their success.
A disciplined annual prune does more than just tidy up your plant; it actively promotes a compact, mounded shape that adds structure and elegance to your garden all year round.
This simple act really does transform lavender from a short-lived perennial into a permanent garden feature. Its neat, silvery mounds provide wonderful visual interest even in the depths of winter, making it a star player in any planting scheme. If you're looking for inspiration, you might be interested in our guide on garden border plant ideas.
When's The Best Time to Prune Lavender?
Get the timing right, and you'll be rewarded with a lavender bush that's compact, healthy, and absolutely covered in flowers year after year. Get it wrong, and you risk a woody, straggly plant or, even worse, no flowers at all.
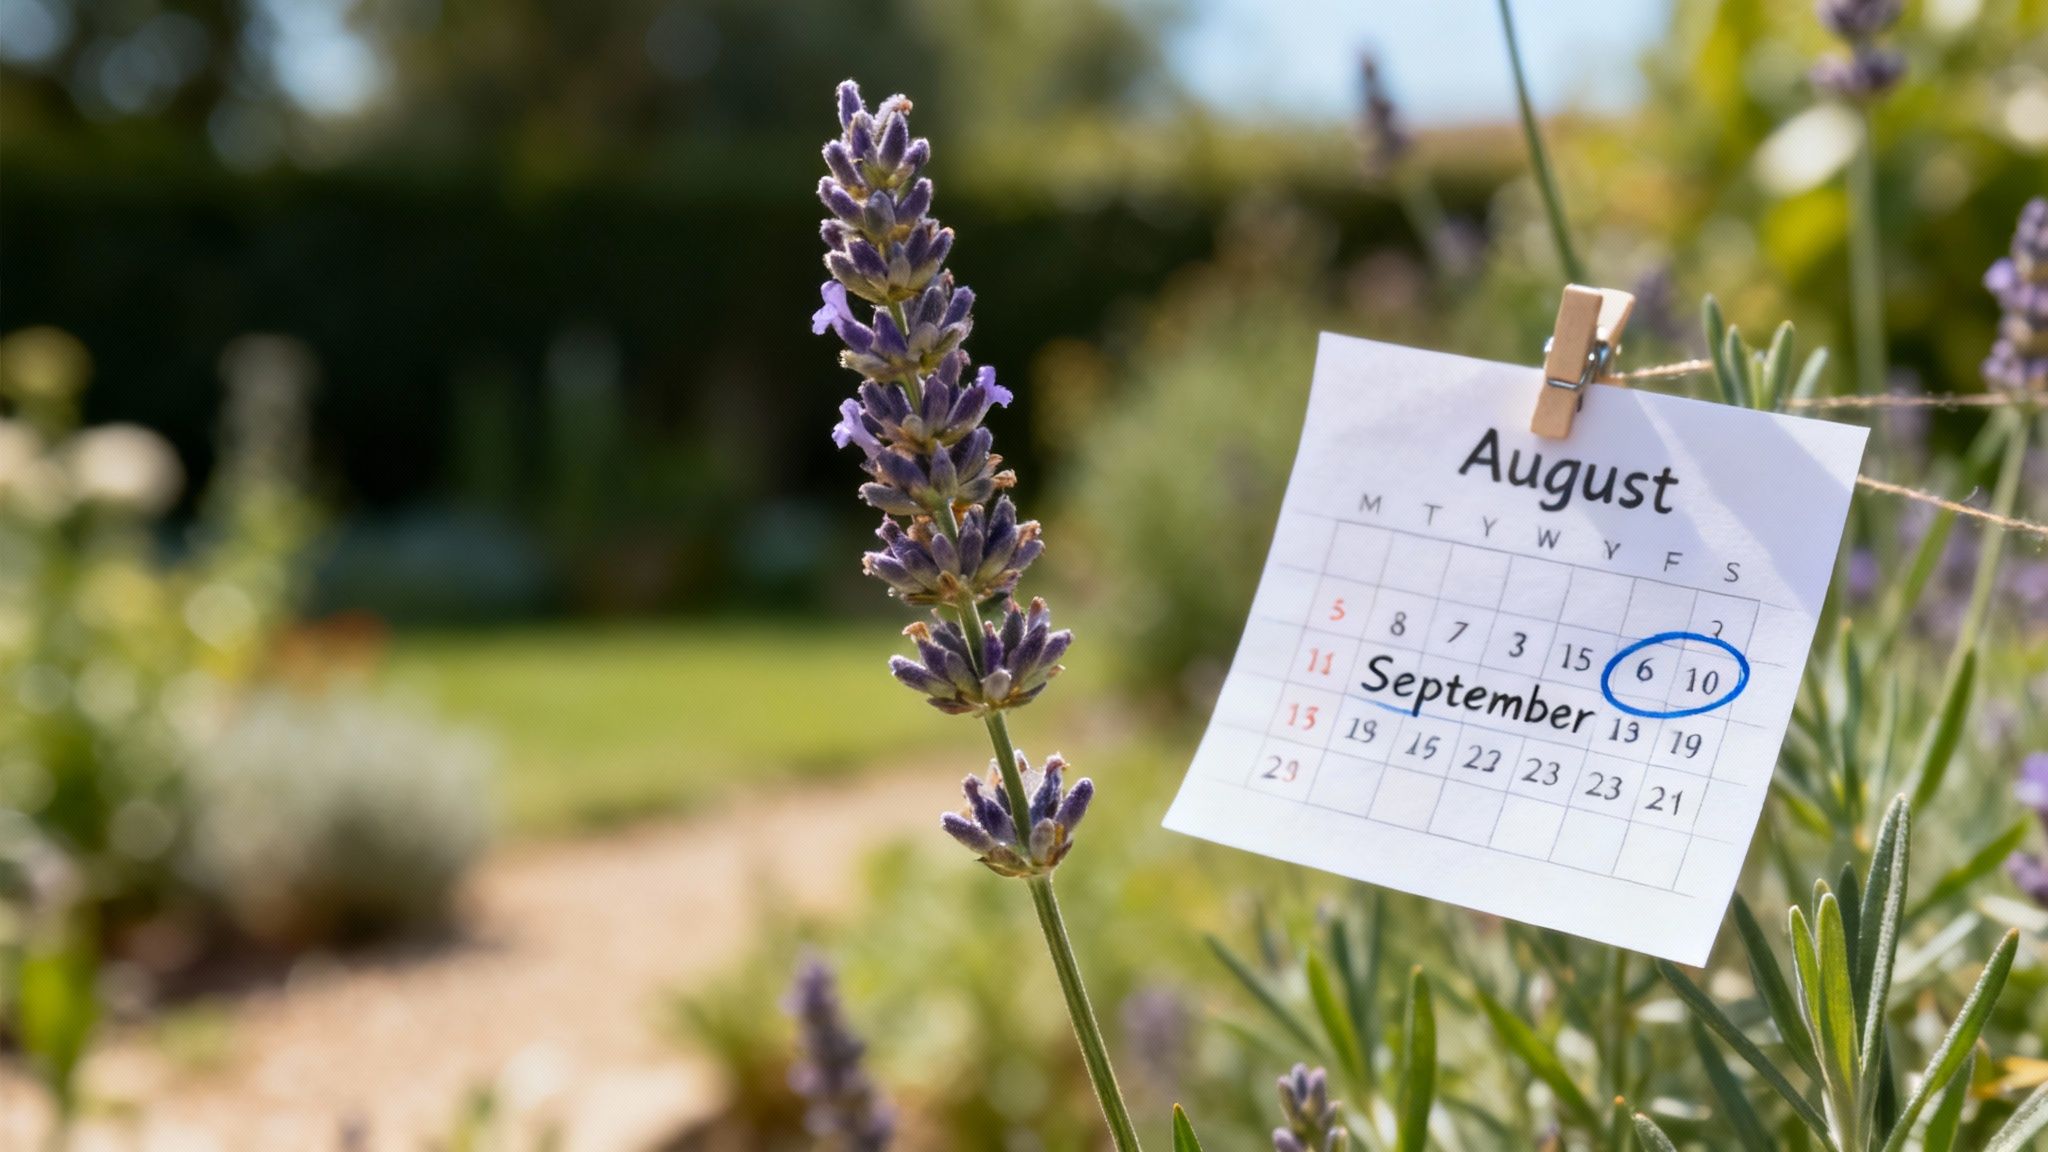
For most lavender varieties grown here in the UK, the best approach involves one main cut and an optional light trim.
The most important prune by far happens in late summer, usually somewhere between August and early September. You'll know it's time when the brilliant purple has faded from the flower spikes and they begin to look a bit tired and grey.
Cutting back at this point gives the plant just enough time to produce a little fresh growth, which can then toughen up before the first frosts bite. It's a method honed by the experts; in fact, over 95% of UK lavender farms do their main harvest and prune right after the peak bloom, which is often in early August. This timing ensures the highest concentration of essential oils. You can see this process on a massive scale at places like Cotswold Lavender, as detailed on Graziers Cottage.
A second, much lighter trim is something you can do in mid-spring, around April. Think of this as less of a prune and more of a tidy-up. It's the perfect opportunity to snip away any stems that look a bit ragged after winter and give the plant a gentle shaping before it bursts into its main growing season.
My Golden Rule: Never, ever prune lavender hard late in the autumn. It stimulates soft, new shoots that stand no chance against the first proper frost, which can seriously damage or even kill the plant.
For more tips on what to do and when, our gardening calendar can help you plan your tasks throughout the year.
Different Lavenders, Different Timetables
While the late summer prune is a great rule of thumb, it helps to know exactly what you’re growing. The two most popular types in British gardens have slightly different needs.
- English Lavender (Lavandula angustifolia): This is your classic hardy lavender, including beloved varieties like 'Hidcote' and 'Munstead'. It’s tough as old boots and responds really well to a good, hard prune in late summer, bouncing back with gusto.
- French Lavender (Lavandula stoechas): You'll recognise this one by the distinctive little "bunny ears" on top of the flowers. It's not as frost-hardy as its English cousin. Give it a light trim after its first flush of flowers finishes in early summer, and another gentle shaping in late August. Avoid cutting it back hard.
To make things simple, here’s a quick reference guide.
UK Lavender Pruning Calendar
This simple schedule is all it takes to keep your lavender looking its absolute best. Happy pruning
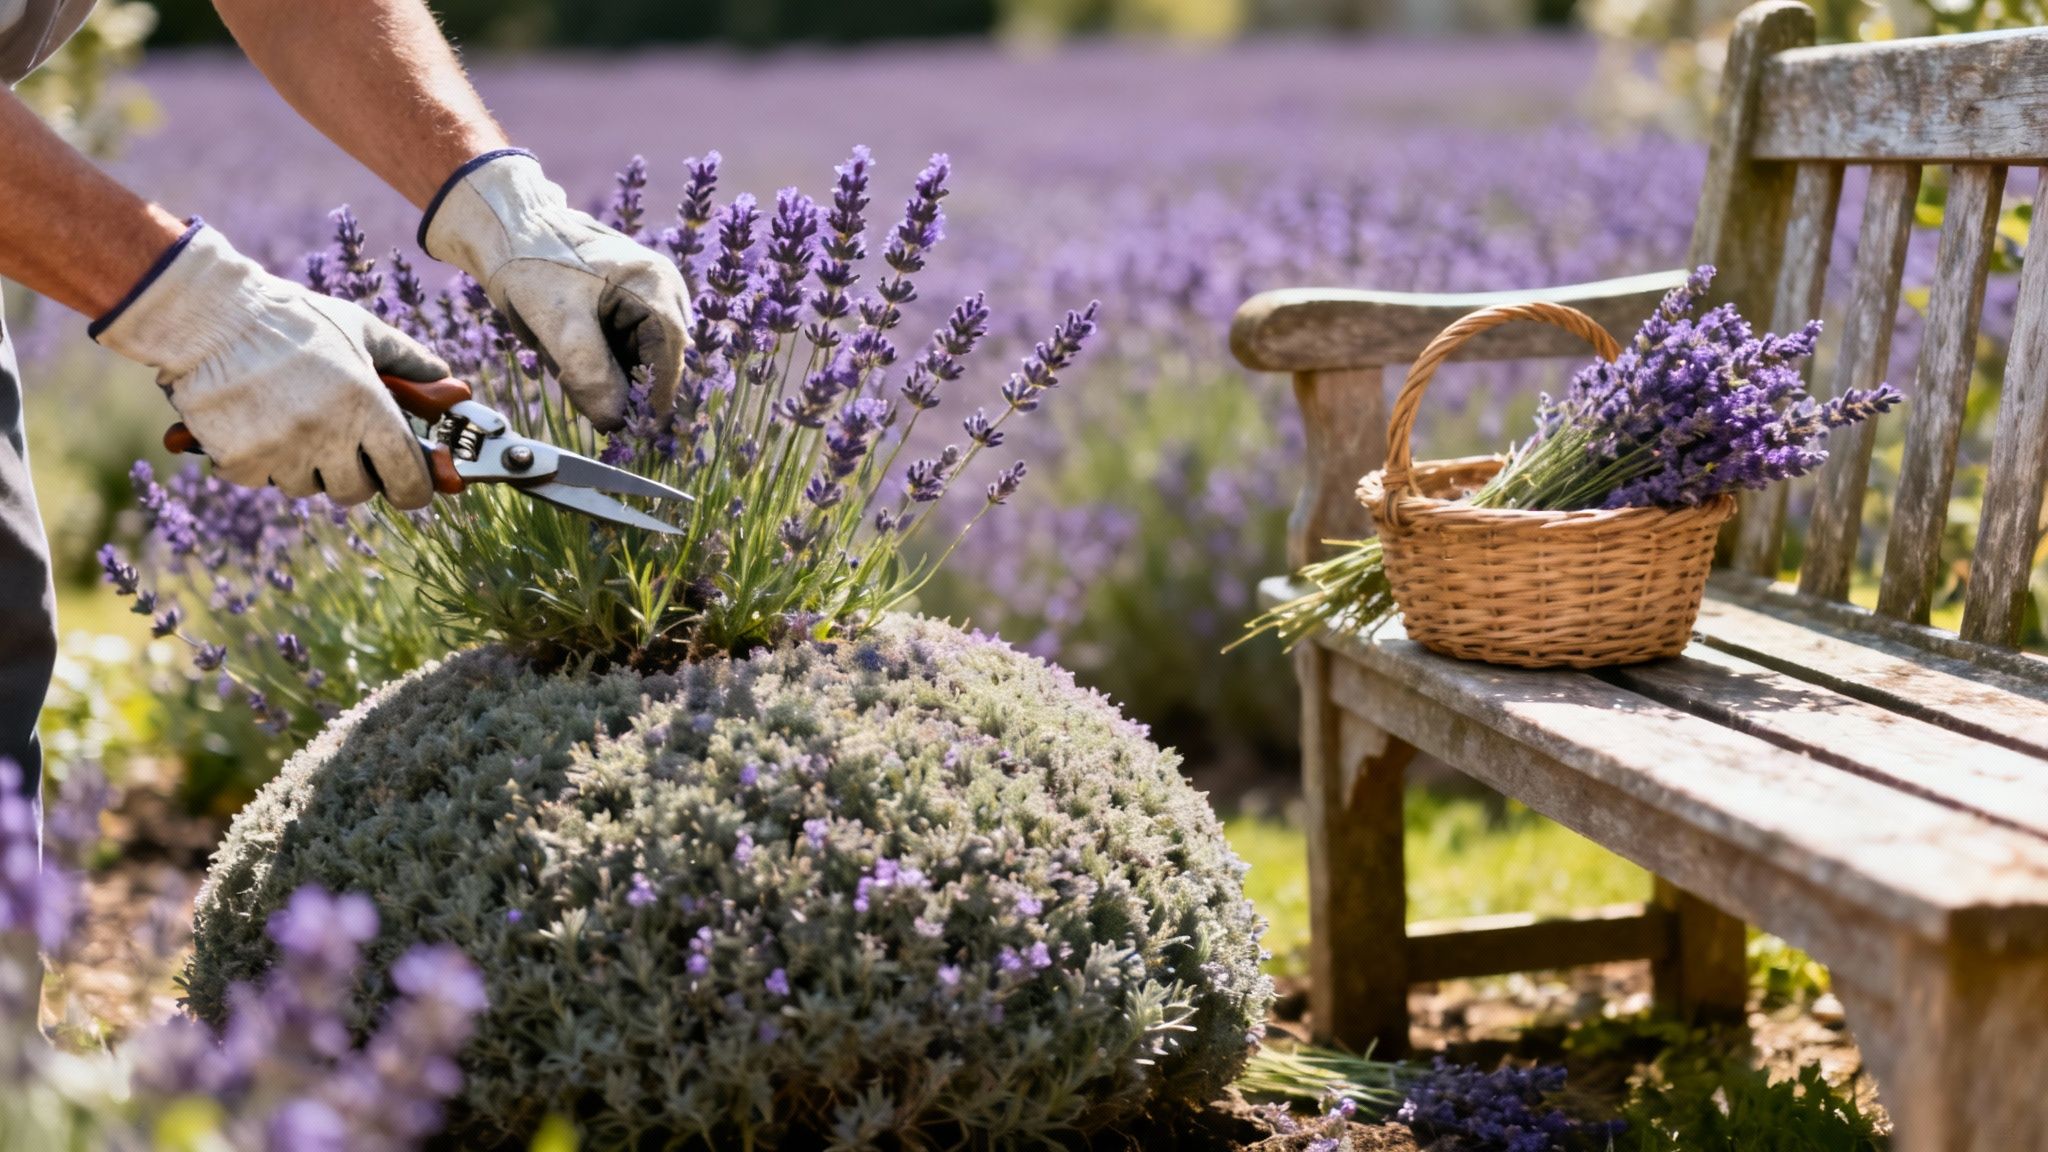
Choosing the Right Tools for a Clean Cut

Any experienced gardener will tell you that great pruning starts with the right equipment. Using blunt or dirty tools is one of the quickest ways to harm your lavender. Instead of a clean slice, they crush and tear the stems, leaving a ragged wound that can invite disease and put the whole plant under stress.
You don't need a massive arsenal of tools, though. For most lavender plants, a sharp, clean pair of bypass secateurs will do the job perfectly. They work just like scissors, with two curved blades passing each other to make a precise cut that helps the plant heal quickly.
Of course, if you’re tackling a huge, overgrown lavender hedge, you'll be there all day with a small pair of secateurs. In that case, reaching for a pair of hedge shears will make the task much faster and more manageable.
Getting Your Tools Ready
Before you even think about making that first snip, take a moment to sterilise your tools. This is a non-negotiable step for me. It’s so simple but absolutely crucial for preventing the spread of fungal and bacterial diseases between plants.
You don't need any special chemicals. Just give the blades a thorough wipe with a cloth soaked in rubbing alcohol or a simple diluted bleach solution.
Taking a few seconds to clean your secateurs is a small investment in the long-term health of your entire garden, not just your lavender. It’s a habit that protects your plants from unseen threats.
Once you’re all done, don’t just toss them back in the shed. Clean and dry them again before putting them away. Looking after your tools ensures they’ll stay sharp and ready to go for years. For some handy tips on keeping them organised, check out our garden tool storage ideas.
The Art of the Perfect Pruning Cut
This is where you get to be confident with your secateurs. Don't think of this as a complex horticultural task; it’s really just giving your lavender a good, shaping haircut. The whole point is to create a tidy, rounded mound that looks smart over winter and sets the stage for a burst of new growth come spring.
As a general rule, I aim to take off about one-third of the plant's leafy growth. If you've got a larger, more established plant, you can often get away with removing up to half. Don't be shy. I’ve found that hardy English lavenders, in particular, respond incredibly well to a firm prune.
Finding the Right Spot to Snip
The most critical part of pruning lavender is knowing exactly where to make the cut. Have a good look at a stem. You’ll notice the soft, silvery-green leafy growth from this season, and below that, the tougher, brown, woody base from previous years.
The golden rule? Always cut into the green or semi-green growth, making sure to leave a few inches of it behind. Never, ever cut right back into the old, bare wood. Lavender just doesn't regrow well from that woody base, and a cut that severe can easily kill the plant.
That said, don't be afraid to give it a hard prune, so long as you can see little green shoots or leaves on the stem below where you plan to cut. Those tiny shoots are your insurance policy—they show the plant has the energy to regrow from that point.
My favourite shortcut for getting an even shape is what I call the ponytail method. Just grab a big handful of stems, like you’re making a ponytail, and snip straight across the bunch with your secateurs. Work your way around the plant like this, and you’ll get a lovely, uniform dome in no time. This little trick also helps open up the plant's centre, improving air circulation and helping to fend off fungal issues during our damp British winters.
The Anatomy of a Good Cut
For the best results, keep these simple principles in mind with every snip:
- Look for new growth: Before cutting a stem, follow it down from the tip. Find the point where it starts to get properly woody and make sure your cut is at least a couple of inches above this, well into the leafy part.
- Check for tiny buds: Look closely at the lower stems. You can often spot minuscule, silvery-green buds just waiting to sprout. Cutting just above these tells the plant exactly where to put its energy.
- Angle your cuts: It's not essential for every single stem, but making slightly angled cuts helps rainwater run off. This can reduce the chance of the cut end starting to rot.
Remember, this isn't a one-size-fits-all job. Every plant has its own character. Step back often as you work, take a look at the overall shape, and tweak it as you go. You're aiming for a compact, dense mound that’s ready to face the winter and explode with colour next summer.
Common Lavender Pruning Mistakes to Avoid
Even with the best of intentions, it’s surprisingly easy to get lavender pruning wrong. I've seen a few common slip-ups turn a routine trim into a real setback for an otherwise healthy plant. Knowing what these pitfalls are is the first step to avoiding them.
The most common mistake I see is pruning too late in the year. If you give your lavender a hard prune in late autumn, you’ll encourage a spurt of fresh, tender growth. This new foliage simply won't have time to toughen up before the first frost hits, which can damage it badly and weaken the whole plant. If you're thinking about cold weather, our guide on protecting plants in winter has some helpful tips.
Another huge no-no is cutting back too far. Being overzealous and chopping right down into the old, brown, woody part of the plant is often a fatal blow. Lavender just doesn't regrow from that old wood. Once you cut into it, that part of the plant is gone for good, and a severe cut can kill the whole thing.
The Trouble with Doing Nothing
On the flip side, simply not pruning is just as bad. It might feel like the safest option, but leaving your lavender to its own devices is the quickest route to a leggy, sprawling plant with very few flowers. That annual trim is what keeps it vigorous and beautifully shaped.
Don't be afraid to give hardy English lavender a firm prune, but always stay in the green. The rule is simple: cut above the lowest set of green leaves or shoots, never into bare wood. This ensures the plant has plenty of nodes to regrow from.
Steering clear of these common blunders will give you the confidence to make the right cuts. The aim is always a compact, healthy mound that will reward you with a spectacular show of flowers year after year.
Your Lavender Pruning Questions Answered
Even with the best instructions, you'll likely have questions once you're standing in front of your plant, secateurs in hand. It happens to all of us. Let's tackle some of the most common queries I hear from fellow gardeners so you can prune with confidence.
Can I Save a Very Old and Woody Lavender Plant?
Reviving a truly neglected lavender that's become a gnarled, woody mess is a real challenge, but sometimes you can pull it off. The absolute worst thing you can do is chop it all back into that old, brown wood at once – that’s a surefire way to kill it.
A much better, gentler approach is to try a rejuvenation prune over two years. In the first spring, cut back about half of the stems by roughly one-third, making absolutely sure you leave some healthy green growth behind. If you see fresh, new shoots appearing from the base of those pruned stems by summer, that's a great sign. You can then repeat the process on the remaining half the following spring.
Honestly though, success isn't guaranteed. Often, the best course of action is to take cuttings and start a fresh, new plant from the old one.
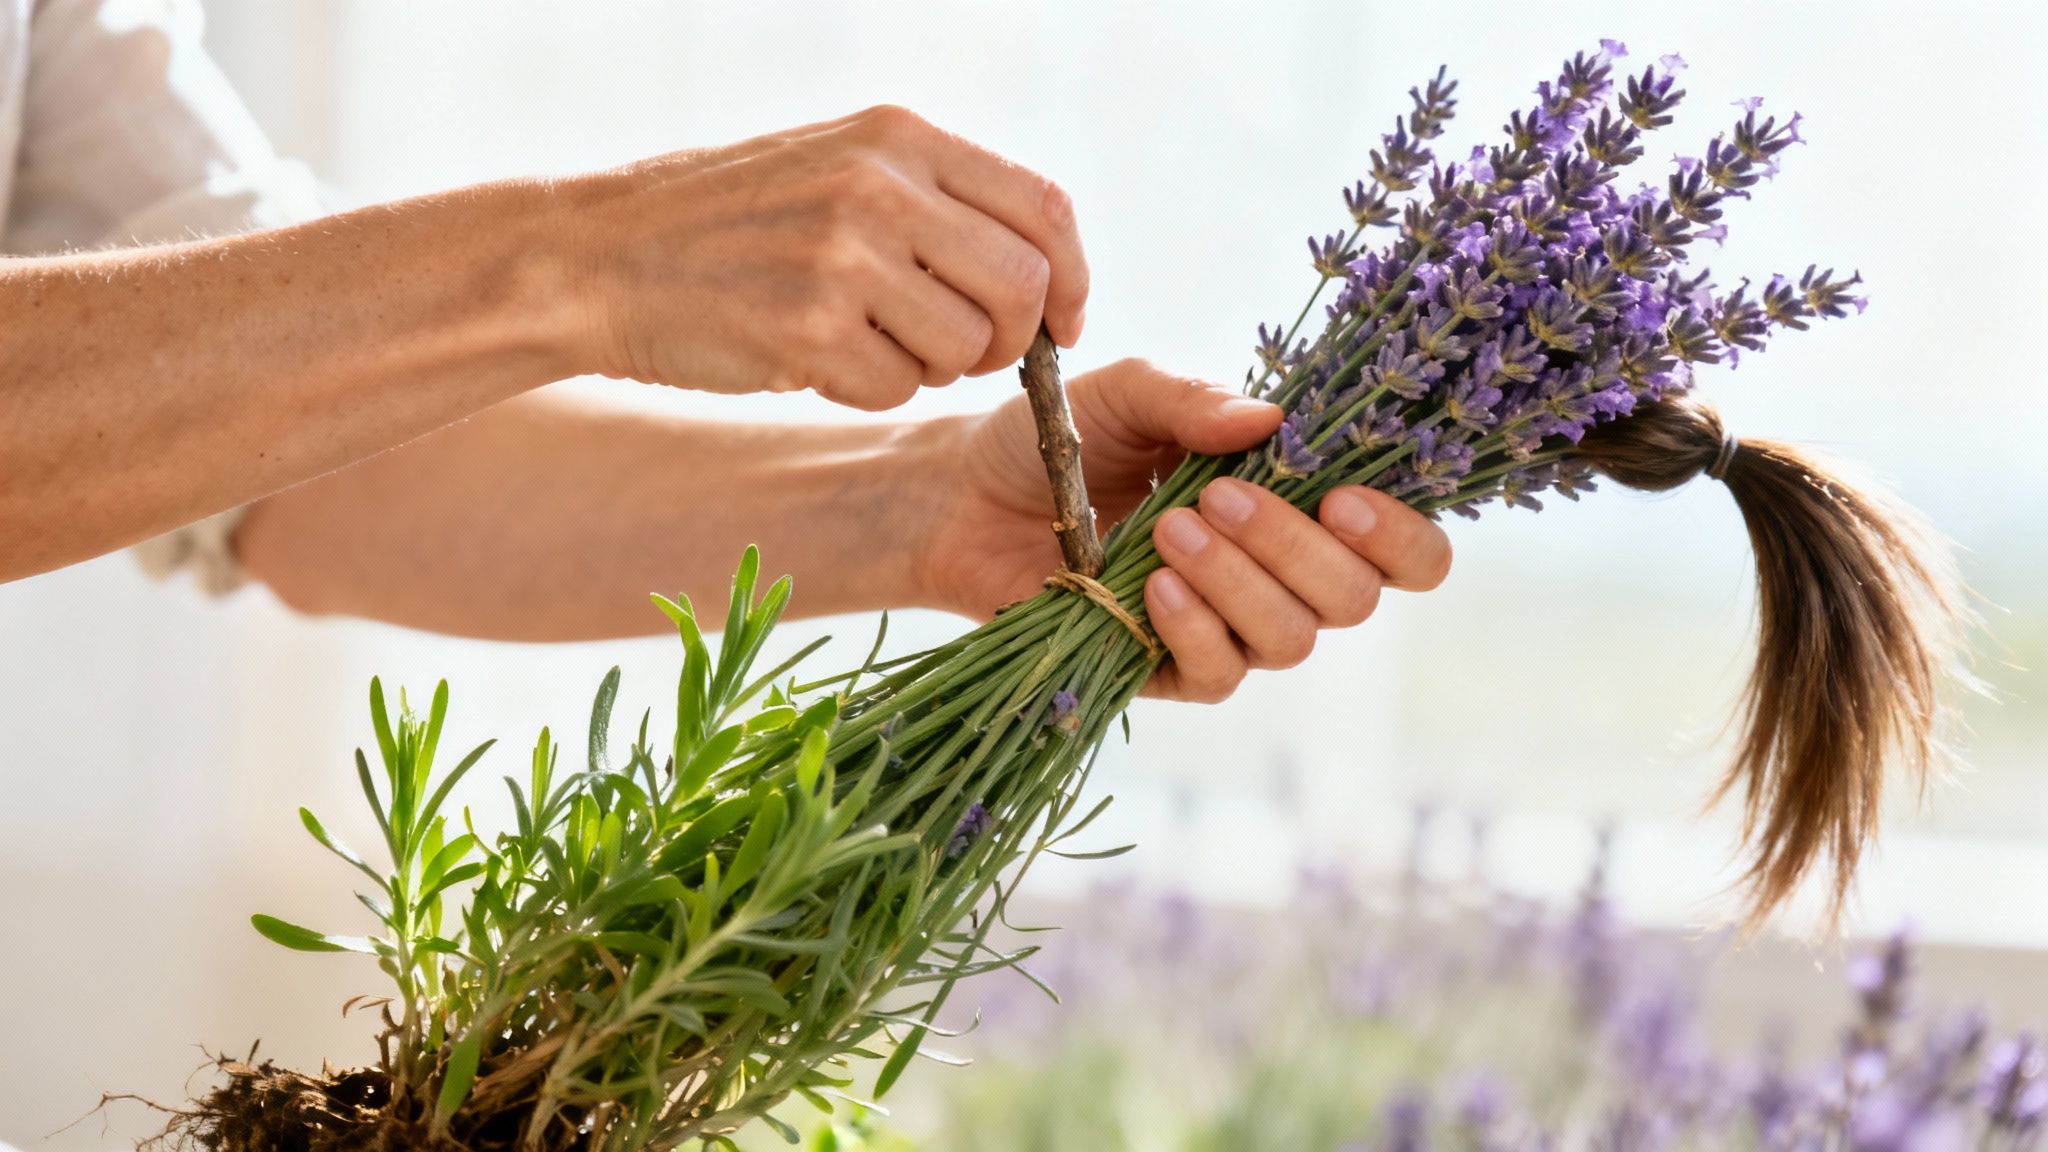
What Can I Do with the Lavender Prunings?
Whatever you do, don't just throw them in the green bin! Those cut flower stems are still packed with that incredible fragrance. Tie them into small bunches with a bit of string and hang them upside down in a dry, dark, and airy spot like a garden shed or a spare room.
Once they're fully dried out, the possibilities are endless:
- Scented Sachets: Gently strip the buds from the stems and pop them into small fabric bags. They're perfect for tucking into drawers and wardrobes.
- Homemade Potpourri: Mix the dried lavender with other dried flowers and spices for a beautiful, natural air freshener.
- Aromatic Fire Starters: The bundled woody stems can be used in a fireplace or wood burner to release a gorgeous scent as they burn.
Any purely leafy stems that don't have flowers can go straight onto your compost heap. For more inspiration on using herbs inside, our guide on growing lavender indoors has some great tips.
Should I Prune a Lavender Plant in Its First Year?
Yes, absolutely. A very light trim after its first flowering season is one of the best things you can do for a young lavender. All you need to do is snip off the spent flower stalks, taking just a tiny bit of the green leafy growth below them.
This gentle first-year 'pinch' encourages the young plant to focus its energy on developing a strong root system and a bushy shape, which stops it from becoming tall and leggy right from the start.