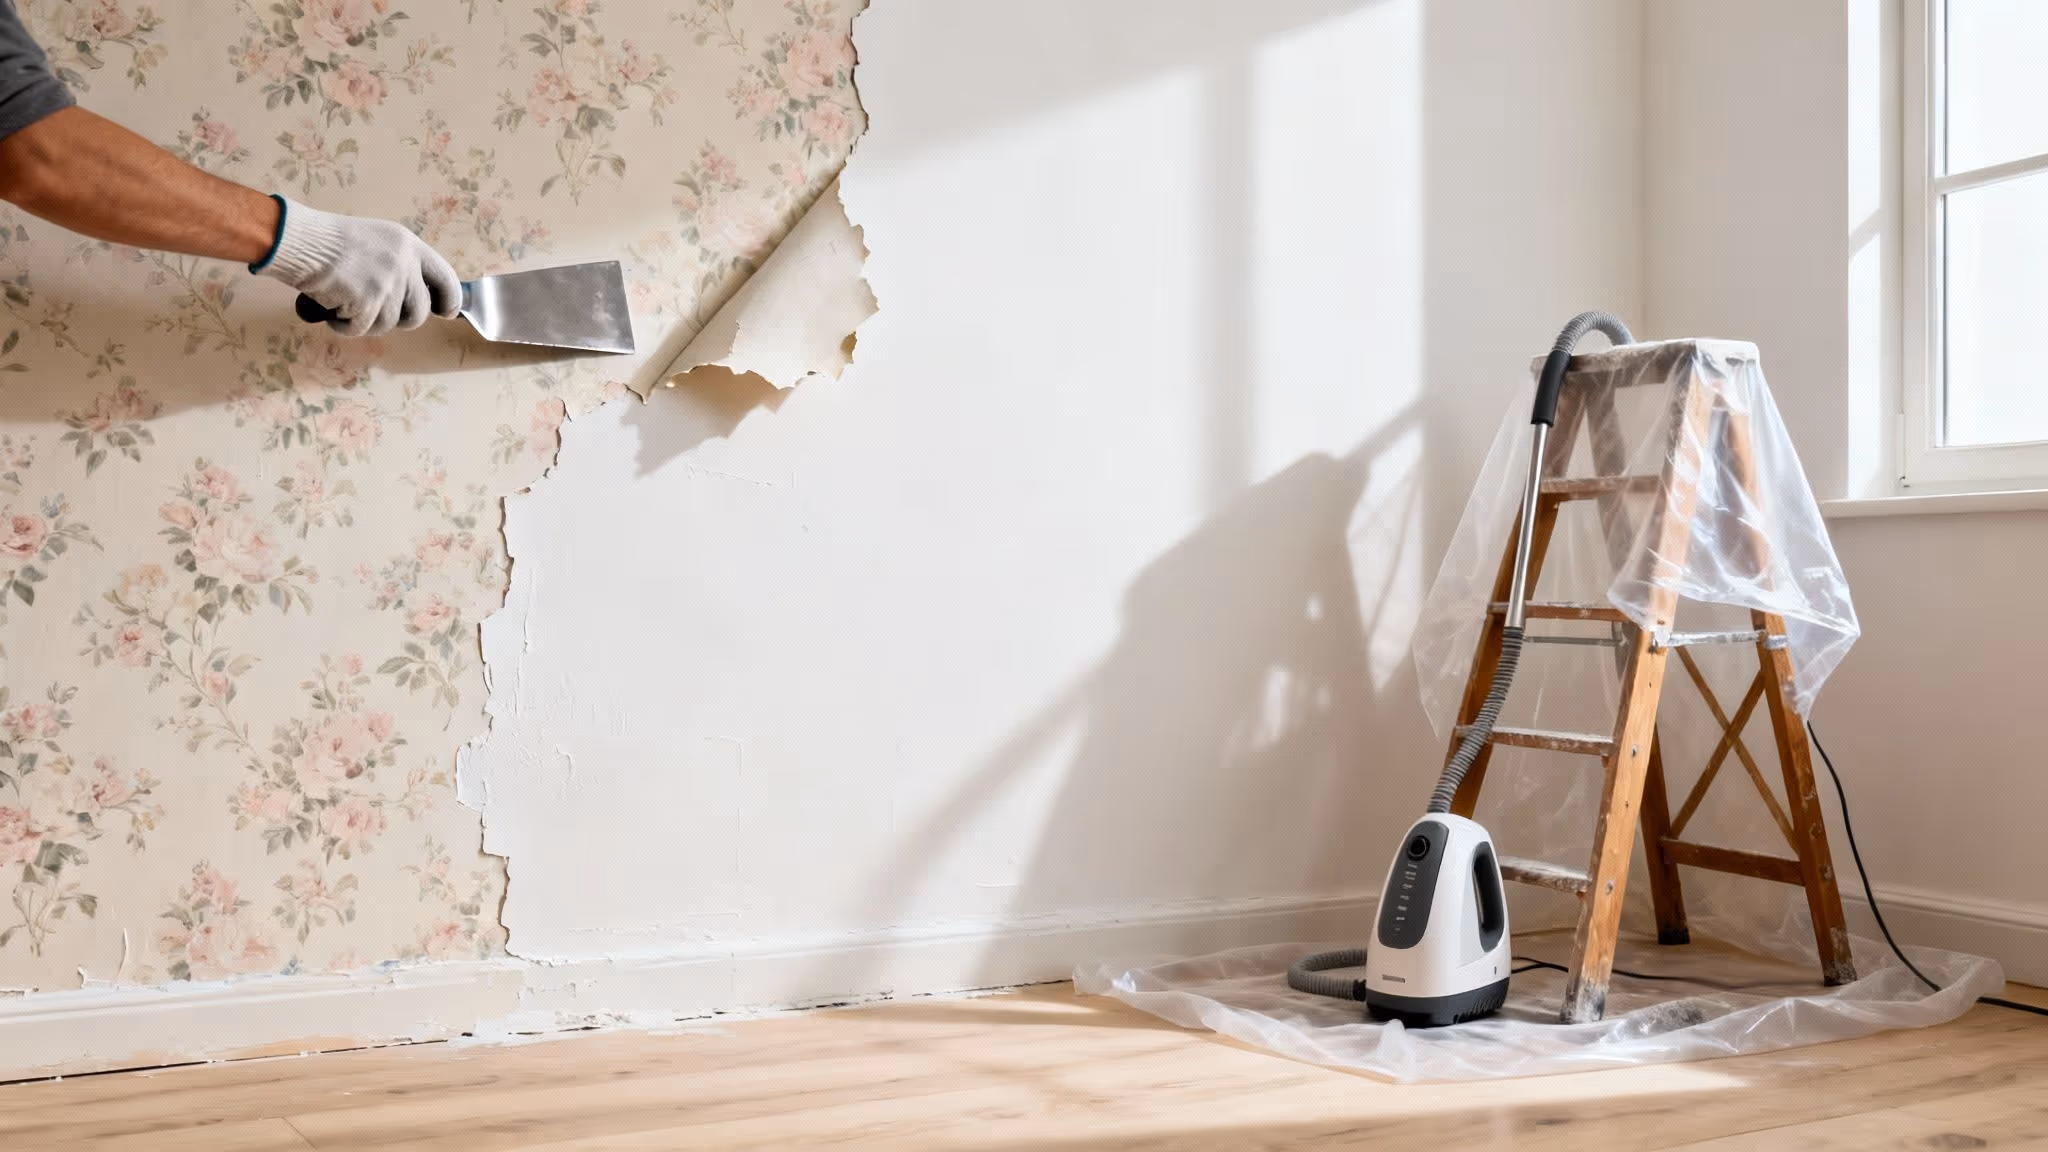
Getting wallpaper off your walls might seem like a Herculean task, but at its heart, the process is pretty straightforward: you soak it, then you scrape it. The real magic, the thing that turns a weekend of misery into a satisfying project, is having the right tools ready to go before you start.
Your Essential Wallpaper Removal Toolkit
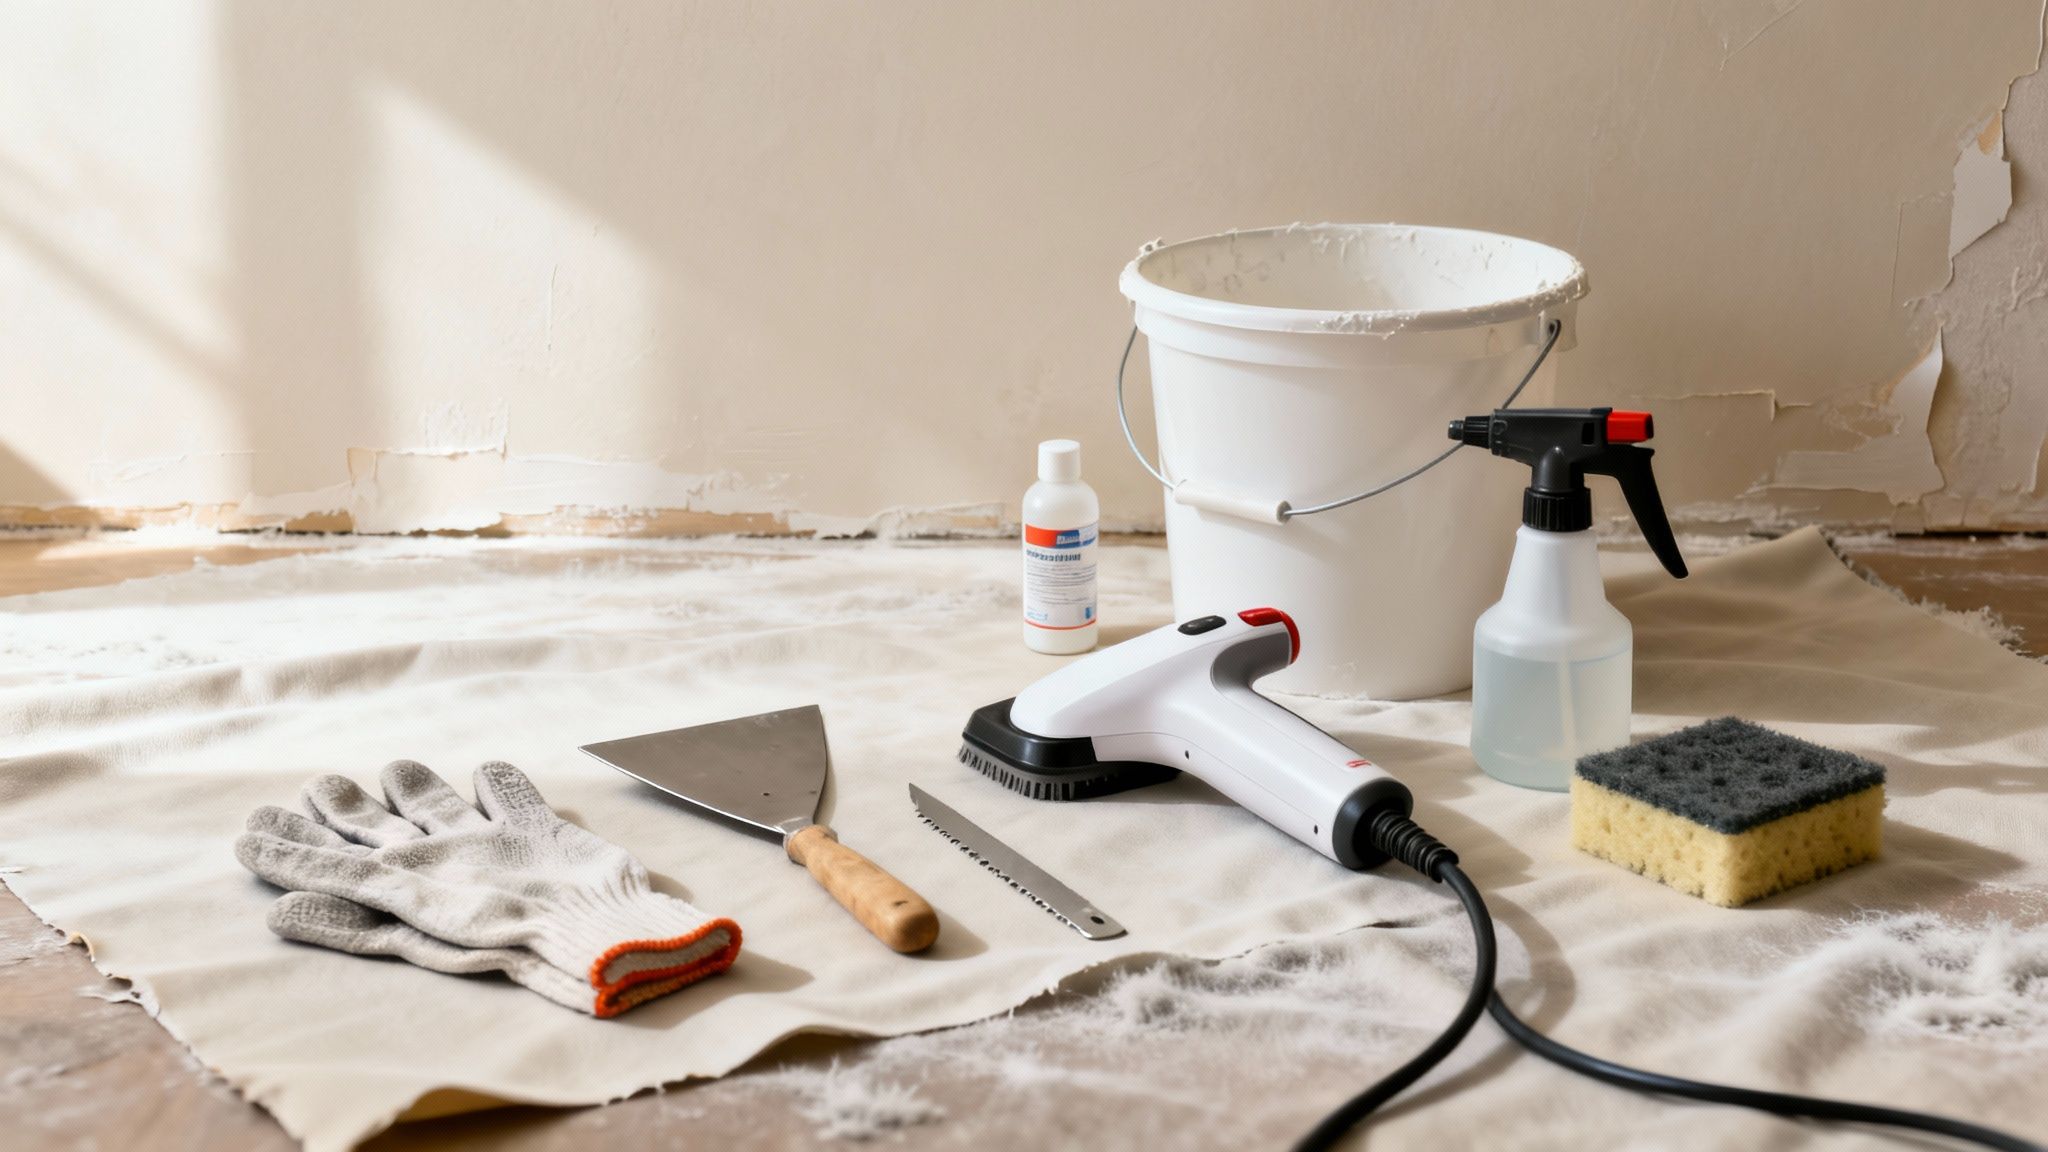
Before you even think about pulling at that first corner, let's get your gear sorted. This isn’t just a shopping list; it’s your battle plan. Trust me, trying to improvise with a butter knife and a bucket will only lead to gouged plaster and a whole lot of regret.
Core Items for Every Project
These are the absolute must-haves. No matter what kind of wallpaper you're up against, you’ll need these basics.
- Dust Sheets or Plastic Sheeting: This job is messy. Protect your floors and any furniture you can't move out of the room.
- Painter's Tape: Use this to hold your dust sheets in place and to mask off skirting boards, light switches, and sockets.
- Protective Gloves: You'll be dealing with a lot of water and sticky gunk, so a decent pair of rubber gloves is non-negotiable.
- A Sturdy Bucket: For mixing your removal solution or simply for holding warm water.
- Sponges and Old Rags: Indispensable for applying water and cleaning the walls down afterwards.
Game-Changing Tools for Efficient Removal
Now for the tools that separate the pros from the frustrated beginners. If there's one piece of advice I can give, it's to invest in a sharp, clean scraper blade. A good one glides under the paper, lifting it cleanly. A dull one just shreds the paper and chews up the plaster underneath. It’s a false economy to skimp here.
Another lifesaver, especially for painted or vinyl wallpapers, is a scoring tool. This little gadget pokes thousands of tiny holes in the paper’s surface, letting your water or stripping solution get behind it to work on the paste. Without it, you’re basically just wetting the top layer, which is a bit like trying to put out a fire with a water pistol.
For more hands-on advice like this, check out our complete guide to home improvement tips.
A Quick Tip from Experience: The goal here is finesse, not brute force. It's about letting water and patience do the hard work for you. Sometimes, a simple garden sprayer filled with warm water can be just as effective as a bulky steamer, especially on older, more porous papers.
It seems a lot of people are catching on. Across the UK, DIYers are increasingly reaching for more specialised equipment. In fact, recent figures show that 40-50% of households now use steamers or chemical strippers, which can speed up the job by as much as 50%.
Essential vs Optional Wallpaper Removal Tools
To make it even clearer, I've broken down the toolkit into what you absolutely need versus what's nice to have. Your choice will often depend on the type of wallpaper you're tackling and your budget.
Ultimately, having even a few of the "optional" tools can make a world of difference, turning a potential DIY disaster into a project you can be proud of.
Preparing Your Room for a Mess-Free Project
There’s no getting around it: removing wallpaper is a messy job. You’re going to be dealing with wet strips of paper, globs of sticky paste, and plenty of water. But if you prep the room properly from the start, you can keep the chaos contained and make the final clean-up a whole lot easier.
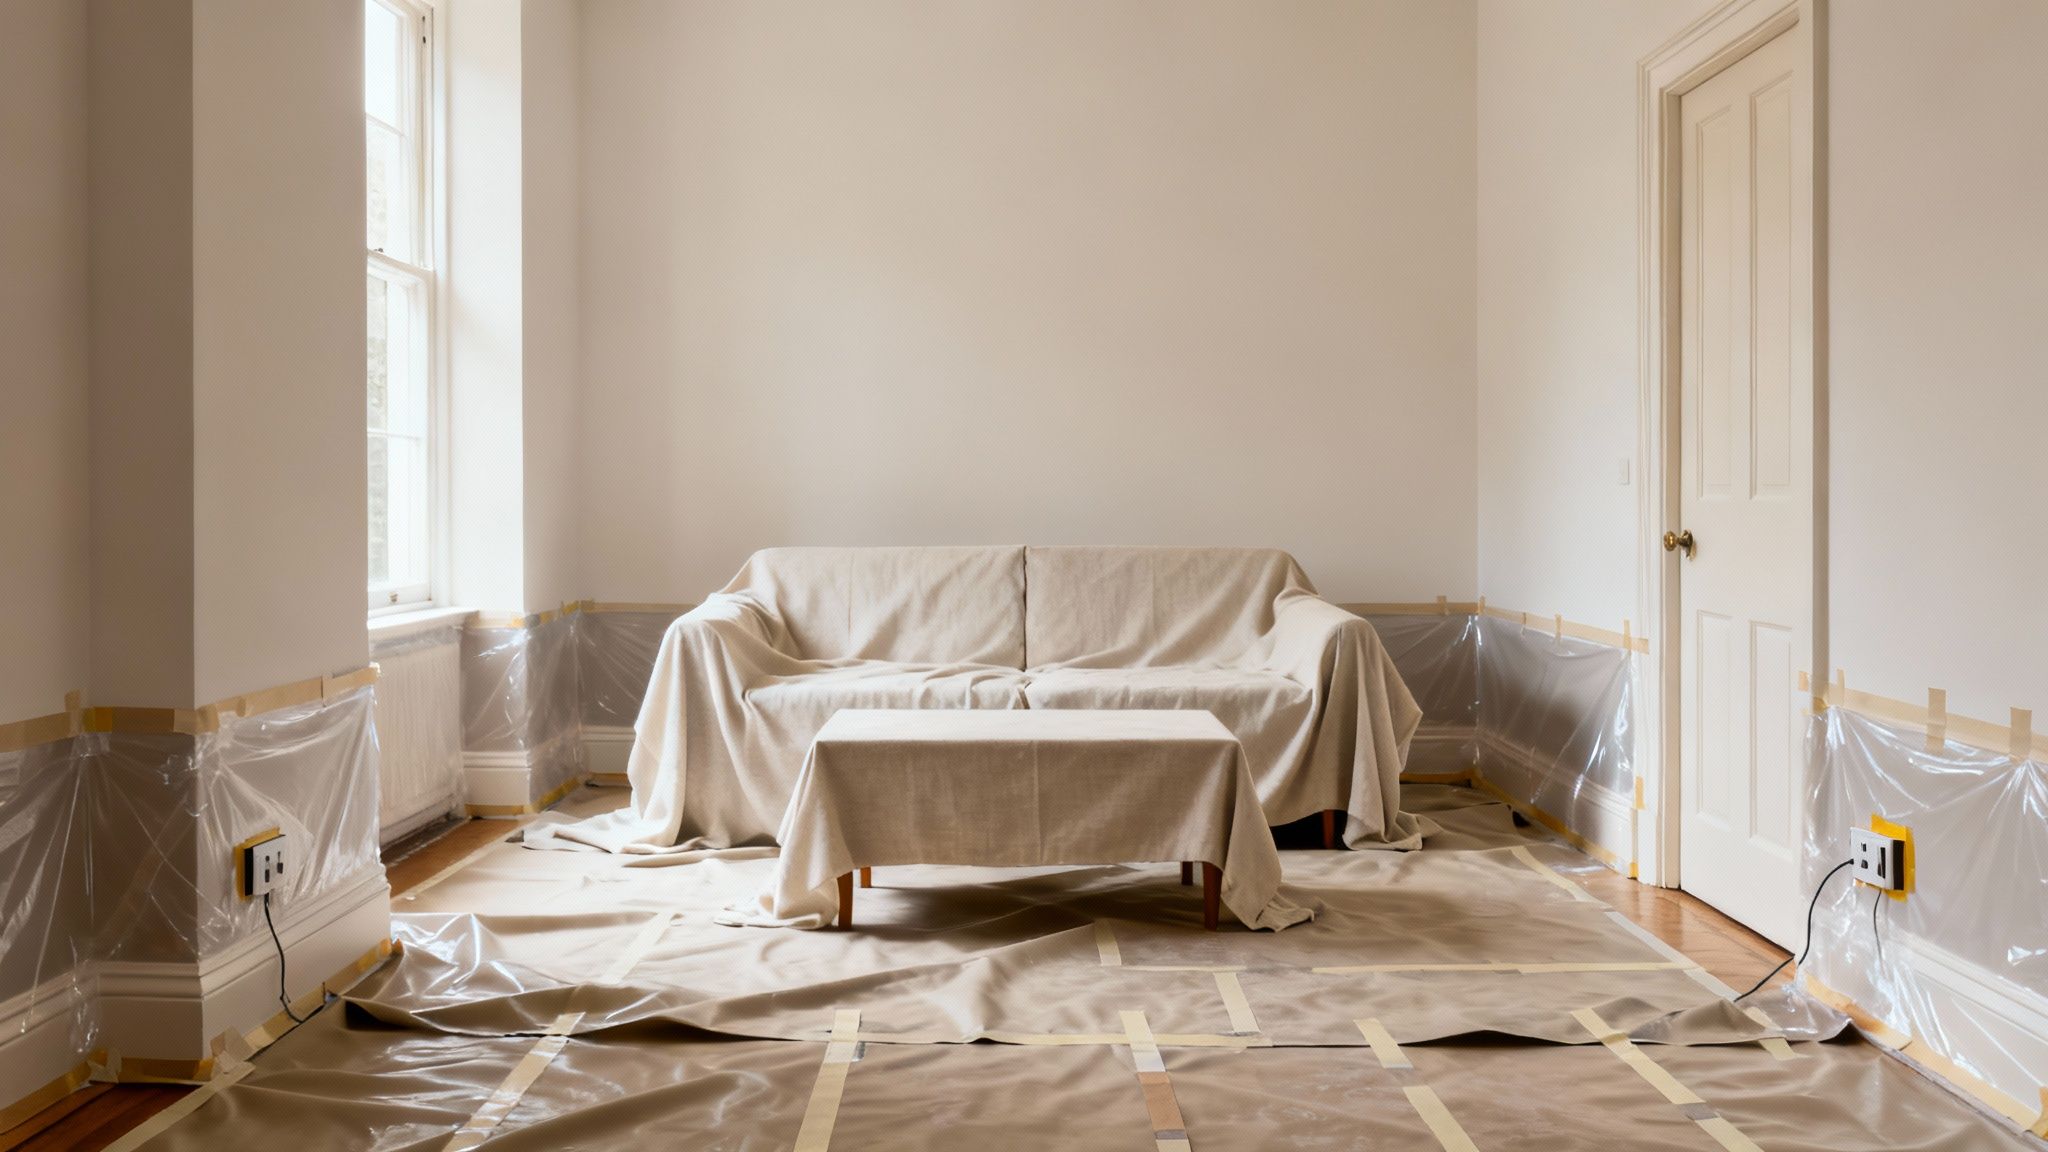
First things first, get everything out of the room that you possibly can. Furniture, rugs, curtains, and pictures should all be moved somewhere else. This isn’t just to protect them; it’s to give yourself a clear, safe space to move around with a stepladder without constantly bumping into things.
If you’ve got a heavy sofa or a built-in unit that can't be moved, pull it into the centre of the room. Then, cover it completely with a heavy-duty dust sheet.
For more inspiration on how to make the most of your space during a project, you can discover some clever storage ideas to build in while you renovate.
Protecting Floors and Fixtures
With the furniture sorted, your next target is the floor. My go-to method is a two-layer approach: start with plastic sheeting taped securely to the skirting boards, and then lay canvas dust sheets on top. The plastic acts as a waterproof barrier, while the canvas soaks up drips and provides a much less slippery surface to walk on.
Remember to cover every single surface you don't want to get wet or sticky. This includes door frames, window sills, and especially built-in shelving. It’s far easier to spend ten minutes taping than hours scraping dried adhesive off woodwork.
Now for the electrics. Safety is paramount here, so your first step is to shut off the power to the room at your consumer unit (fuse box). Don't just rely on the light switch.
- Once the power is off, carefully unscrew the faceplates from all your light switches and plug sockets.
- Cover the exposed openings completely with good-quality painter’s tape. This stops any water from getting where it shouldn’t.
- If you have ceiling lights, you can either remove them entirely or wrap them securely in plastic bags sealed with more tape.
Taking the time to do this properly sets you up for a much smoother project. It protects your home from damage and means that once the old wallpaper is gone, you won’t be left with a mammoth cleaning task.
How to Figure Out What Type of Wallpaper You Have
Before you even think about picking up a scraper, you need to know what you’re up against. Not all wallpapers are the same, and the type stuck to your wall dictates the entire removal process. Getting this wrong can turn a weekend job into a week-long nightmare.
The best way to start is with a simple investigation in a discreet spot.
Find a corner of the room that’s usually hidden—behind a door or a tall piece of furniture is perfect. Grab a utility knife and carefully try to lift a corner of the paper. What happens next tells you everything.
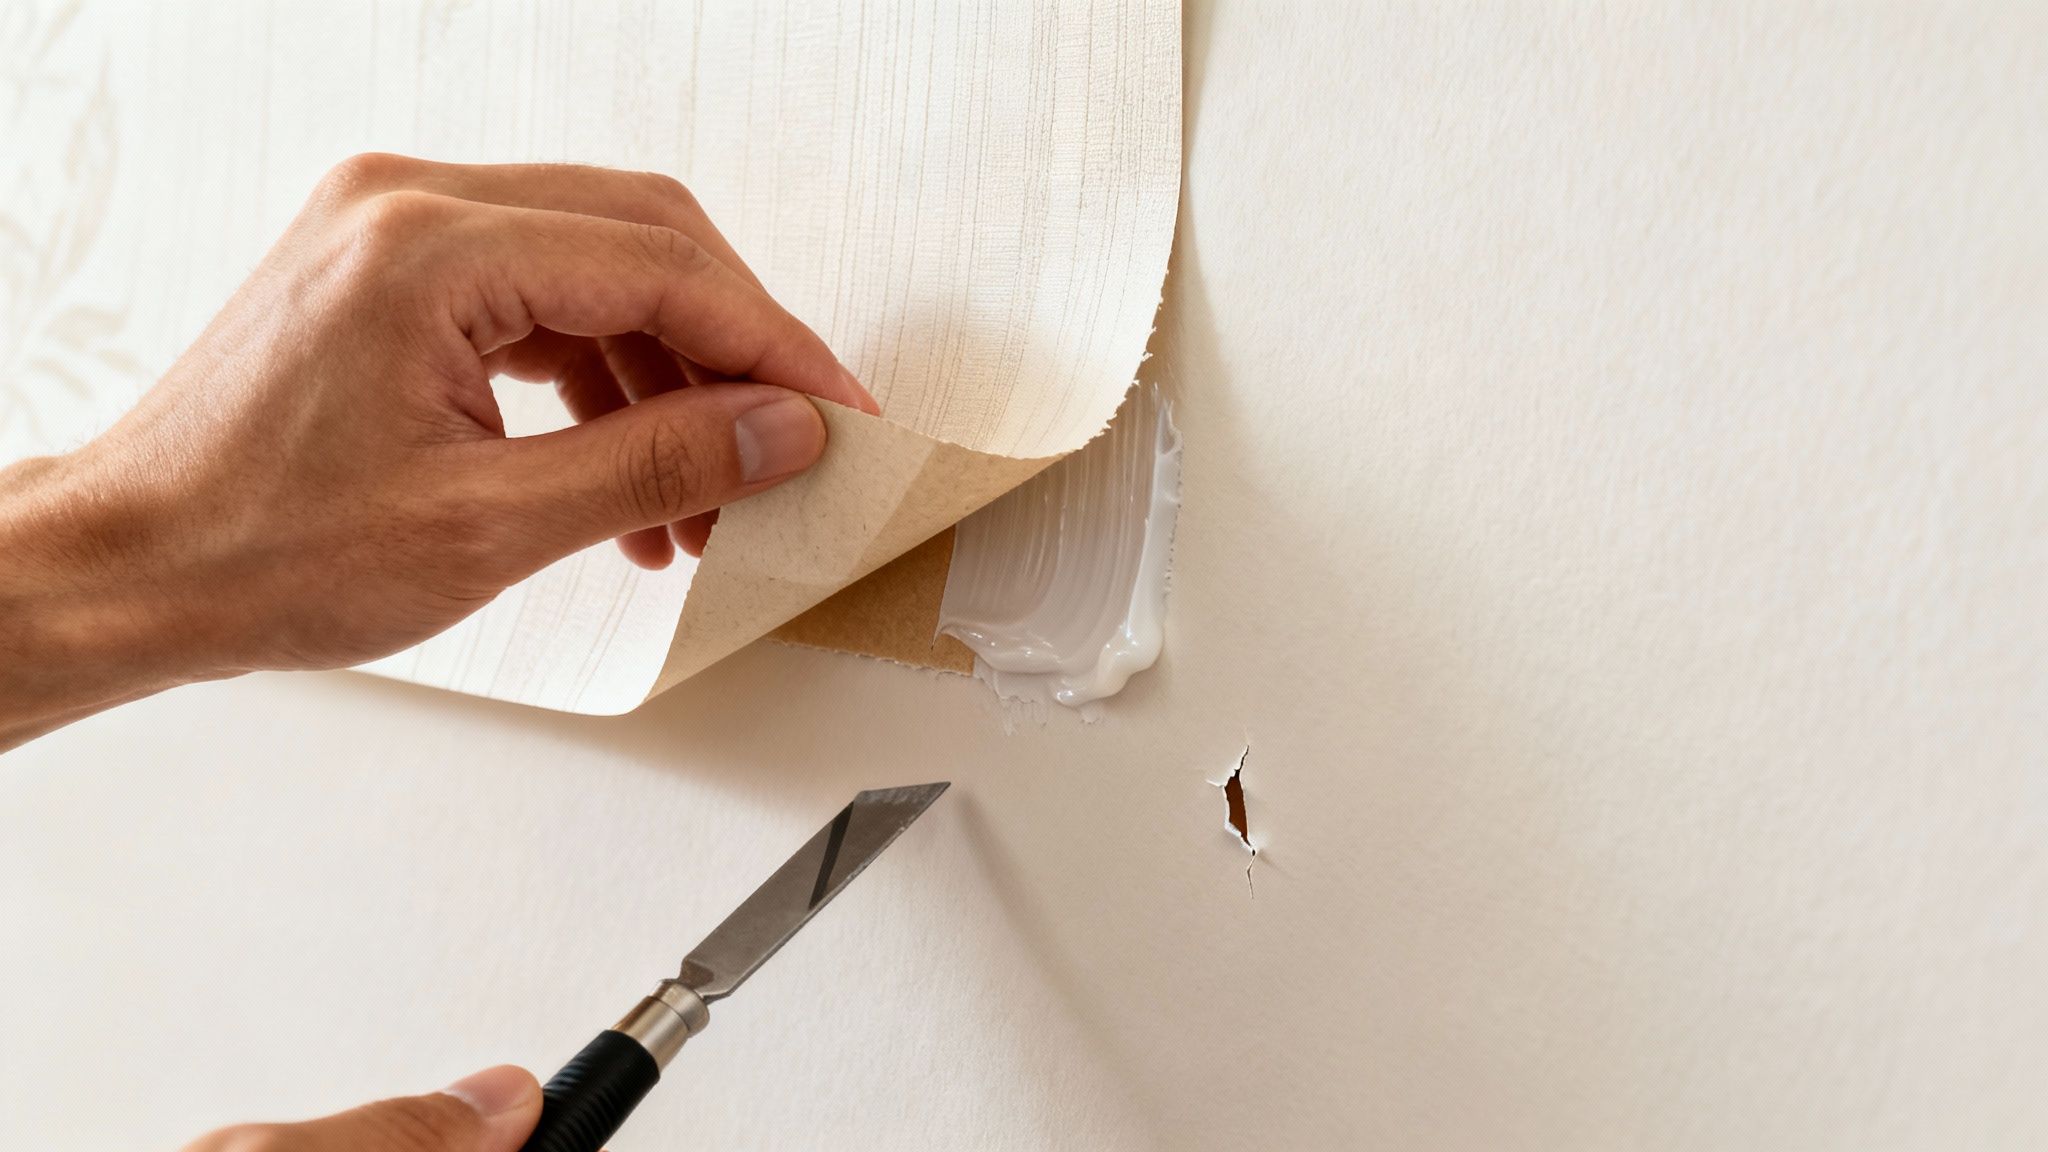
Dealing with Strippable or Peel-and-Stick Wallpaper
Did the corner lift easily? Does the paper come away in a large, clean sheet with hardly any effort? If so, you can breathe a sigh of relief. You’ve hit the DIY jackpot with either strippable or peel-and-stick wallpaper.
These modern papers are designed specifically for easy removal, leaving little to no sticky mess behind.
- Strippable Paper: Usually made of vinyl or non-woven materials, it’s made to be pulled off in one go.
- Peel-and-Stick: Essentially a giant, decorative sticker. Very common in rental properties or for creating a feature wall.
To get this off, just grab a seam and pull downwards at a 45-degree angle. The trick is to go slowly and maintain steady pressure. If you rush, it might tear, leaving you with annoying little bits to pick off.
Tackling Traditional Paste-Backed Wallpaper
Now, what if your corner test didn’t go so smoothly? If the top layer peeled off but left a thin, papery backing stubbornly stuck to the wall, you’re looking at traditional, paste-backed wallpaper. You'll see this a lot in older UK homes, and it demands a bit more patience and a lot more moisture.
This type of wallpaper was meant to stay put, so the adhesive is seriously strong. The only way forward is to dissolve that old paste with water or a removal solution. This is where scoring comes in—you have to punch tiny holes in the paper’s surface so the liquid can get through to the glue and do its work.
The growing popularity of user-friendly options marks a big change in home decor. Non-woven wallpapers are a fast-growing segment of the UK's USD 107.8 million wallpaper market precisely because they're easy to apply and remove. This trend is great news for DIYers who much prefer straightforward soak-off or peel-off methods. You can explore more on UK wallpaper market trends to see how the industry is changing.
The Challenge of Painted-Over Wallpaper
The toughest job by far is wallpaper that someone has painted over. If your corner test reveals a stiff, painted surface that just cracks or chips when you try to lift it, you’ve got an extra layer to contend with. The paint has created a waterproof seal, and no amount of water will get through to the old adhesive underneath.
Your first mission is to break that seal. This means you need to get serious with your scoring tool. Don’t be gentle; you have to perforate the surface aggressively so your removal solution can soak through the paint and the wallpaper. It’s a slow process and you’ll probably need to apply the remover several times, but it’s the only way to loosen that decades-old paste. It's a tough one, but definitely not impossible.
Choosing Your Wallpaper Removal Method
Right, you’ve figured out what kind of wallpaper you’re up against. Now it’s time to pick your battle plan. How you get that paper off the wall really comes down to its age, the type of glue holding it on, and frankly, how much patience you have on any given day. Your main options are the classic soak-and-scrape, bringing in a steamer, or using a chemical remover.
There's no single "best" method. What works like a charm in the living room might turn into a sticky nightmare in the hallway. It’s all about matching the technique to the specific wallpaper situation you're facing.
The Simple Soak-and-Scrape Method
This is wallpaper removal at its most basic and is often all you need. It’s cheap, straightforward, and uses a simple mix of warm water, maybe with a squirt of washing-up liquid, to dissolve the old paste.
Just get the solution onto the wall with a big sponge or a garden sprayer, let it soak for a good 5-15 minutes, and then you can start gently scraping. The absolute key here is patience. You have to give the water enough time to work its magic on the glue. If you jump the gun, you'll just end up peeling off tiny, frustratingly dry bits of paper.
- Best For: Older, more porous wallpapers and in rooms where you want to keep fumes and moisture to a minimum.
- A quick tip: Work in small, manageable sections, about a square metre at a time. This stops the paper from drying out before you get a chance to scrape it.
Bringing in a Wallpaper Steamer
When you’re staring down multiple layers of ancient wallpaper, or someone has painted over it, a steamer is your best mate. It blasts hot steam into the paper, softening both the wallpaper and the adhesive behind it much faster than water alone, making it surprisingly easy to peel away.
Hold the steamer plate against the wall for around 30 seconds or so, just until you see the paper darken with moisture. Then, you can shift the plate to the next spot while you scrape off the section you just steamed. It’s a game-changer for tough jobs, but the machine can be a bit awkward to handle, and you need to watch out for drips of hot water.
I’ve seen this happen a few times: people hold the steamer in one spot for way too long. It’s a common mistake that can soak the plasterboard right through and cause damage. Keep the steamer moving for a steady, damage-free result.
The hassle of stripping old wallpaper is a big reason why many people in the UK think twice before putting it up. In fact, this tricky removal process accounts for an estimated 20-30% of hesitation from homeowners choosing between wallpaper and paint. It’s no wonder easier-to-remove options are becoming so popular.
Using Chemical Wallpaper Removers
For the truly nightmare jobs—like waterproof vinyl papers or those stuck on with a modern, super-strong adhesive—a chemical stripper might be your only option. These are concentrated formulas that you mix with water and apply to the wall.
They work by using chemicals to break down the paste much more effectively than just water or steam. This power comes at a price, though. You must have the room well-ventilated, so get all the windows and doors open, because the fumes can be pretty potent.
Always wear protective gloves and safety glasses when you're handling these products. They work brilliantly, but I'd always recommend trying water or steam first and keeping chemicals as your last resort. Sometimes, you might even look for ways to avoid removing it altogether. If that sounds tempting, you might want to read our guide on whether it's a good idea to paint over wallpaper.
Comparing Wallpaper Removal Methods
To help you decide which approach is right for your project, here’s a quick breakdown of the three main techniques. Think about the type of wallpaper you have and how much time and effort you're willing to put in.
Ultimately, the best method is the one that gets the job done efficiently without damaging your walls. Don't be afraid to start with the simplest method (soak-and-scrape) and escalate to a steamer or chemicals only if you need to.
Cleaning and Repairing Your Walls for a Perfect Finish
Getting that last strip of wallpaper off the wall is a great feeling, but hold the celebration—the job isn't quite done. This final stage is what separates a decent job from a truly professional-looking finish, whether you plan to paint or hang new paper.
First things first, you need to wash the walls. I know, they might look clean, but trust me, there’s a thin, sticky film of old adhesive left behind. If you paint straight over this stuff, you're asking for trouble. The new paint can crackle, peel, or stay annoyingly tacky for weeks.
A simple solution of warm water with a dash of washing-up liquid will do the trick. Grab a large sponge and wash the walls from top to bottom. It's a good idea to have a second bucket of clean water handy to rinse your sponge out frequently. Once you’ve washed everything, give the walls a final wipe-down with just clean water to get rid of any soap.
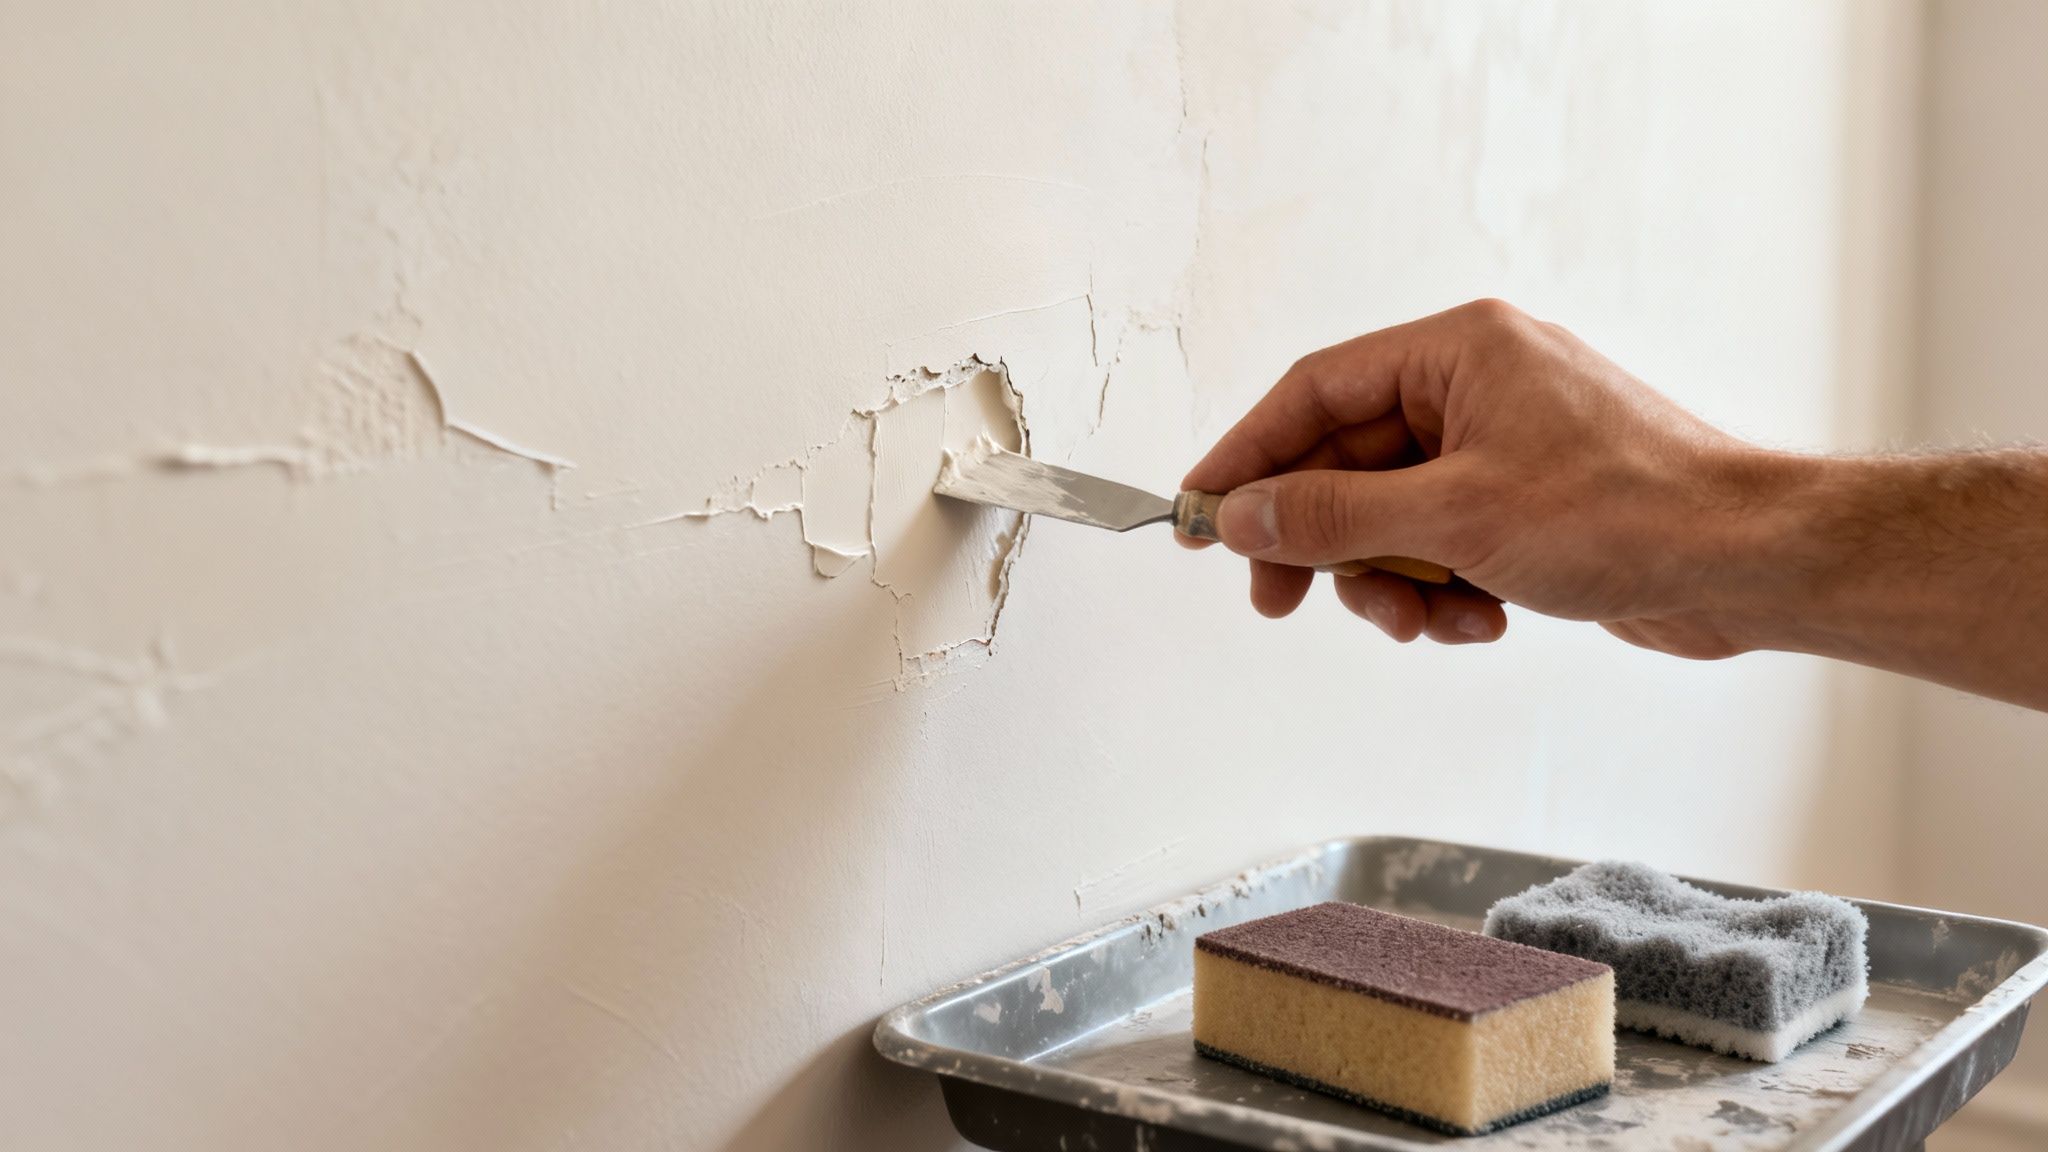
Making Minor Wall Repairs
Let the walls dry completely, then it’s time for a close inspection. You’re almost guaranteed to find a few battle scars from the removal process. We're talking about small gouges from your scraper, tiny hairline cracks, or little divots where stubborn bits of paper took a piece of plaster with them.
For these minor fixes, a good quality, ready-mixed filler is your best friend.
- Filling Gouges and Cracks: Using a flexible filling knife, press the filler firmly into the hole. It's best to overfill it just a little, as most fillers shrink slightly as they dry.
- Getting it Smooth: Once the filler is in, draw the clean edge of your filling knife across the repair to scrape off the excess, leaving it as flush with the wall as you can.
The real aim here is to create a surface so smooth that you can't feel the repairs when you run your hand over them. Even the tiniest bump or ridge will be glaringly obvious under a fresh coat of paint, so a bit of patience now pays off big time.
After the filler is fully cured—check the tin for timings, but it’s usually a few hours—it’s time to sand. I find a 120-grit sandpaper wrapped around a sanding block is perfect for this. Gently sand your repairs until they are perfectly level with the surrounding wall. And please, wear a dust mask for this part.
Priming Your Walls for Success
This final step is non-negotiable: you have to prime the walls. A coat of good-quality primer does a couple of crucial jobs. It seals the porous surface of the plaster and filler, which stops your new paint from soaking in unevenly and looking patchy.
Priming also gives you a consistent base colour, helping your chosen paint to look its best with fewer coats. This is especially true if you’re going from a dark, old wall to a lighter shade. It's the key to making sure your new paint sticks properly and gives you that crisp, even finish you're after.
Once primed, your walls are finally ready for their transformation. If you need some ideas, our guide on how to choose paint colours has plenty of inspiration to help you find the perfect shade for your newly prepped space.
Answering Your Top Wallpaper Removal Questions
Even the best-laid plans can hit a snag when it comes to stripping wallpaper. It's just the nature of the beast. Getting stuck is part of the process, so let's walk through some of the most common issues I see people run into.
How Do I Know If Wallpaper Has Been Painted Over?
This is a classic problem, but there are a couple of dead giveaways. First, get a bright light and look at the wall from a sharp angle. You can often spot the faint outline of wallpaper seams or a subtle texture telegraphing through the paint.
If you're still not sure, it's time for a little detective work. Find an inconspicuous spot—behind a radiator or in a cupboard works well—and use a utility knife to lightly score the paint. If you reveal a different colour or a sliver of paper pattern underneath, bingo! You've got painted-over wallpaper. This means you'll need to be extra thorough when scoring to break that paint barrier and let the water or remover get to the old adhesive.
Is It Possible to Remove Wallpaper Without Wrecking the Plasterboard?
Yes, absolutely. The secret here isn't muscle; it's patience. The number one enemy of plasterboard is too much water. Oversaturate the wall, and you risk the moisture soaking through to the paper facing of the board itself, which can lead to bubbling and tearing. It's a real headache to fix.
The trick is to work in small, manageable sections.
- Apply your remover and give it just enough time to work its magic on the glue, usually somewhere between 5 and 15 minutes.
- When you start scraping, hold your tool at a very low, shallow angle to the wall.
- I often recommend using a plastic scraper instead of a metal one. It might feel less aggressive, but it dramatically lowers the chances of gouging the plasterboard.
And if you're using a steamer? Keep it moving. Never let it sit in one spot for more than a few seconds.
One of the biggest pitfalls in any home project is rushing the prep work. Believe me, taking the extra time to be careful and gentle with your walls now will save you a world of pain and hours of repair work later.
What’s the Best Way to Get Rid of Stubborn Glue Residue?
Ah, the dreaded leftover adhesive. It’s sticky, stubborn, and can completely ruin a fresh coat of paint. My go-to method is a simple solution of warm water mixed with a squirt of washing-up liquid. You can also buy specialised adhesive removers which work well. Just sponge it on, let it sit for a few minutes to soften that old glue, then wipe it all away with a clean rag.
For those really persistent patches, a 50/50 mix of white vinegar and warm water often does the trick. The most crucial part, though, is the final step: rinse the wall with a sponge and clean water. This gets rid of any lingering residue from your cleaning solution, ensuring your new primer and paint stick properly for that perfect, professional finish. Thinking ahead is key, and you can learn more about how to avoid common renovation mistakes in our detailed guide.


