
As the garden's vibrant summer show comes to a close, your focus naturally shifts from frantic growth to thoughtful preparation. Getting your garden ready for a UK winter isn't just about tidying up; it's a crucial investment in the health and success of next year's plants.
Think of it as putting the garden to bed properly. A few key jobs now will prevent diseases from taking hold, protect your favourite perennials from the worst of the frost, and give your soil a chance to rest and recharge.
Your Winter Garden Prep Game Plan

This proactive approach is so much more than making things look neat over the colder months. It’s a strategic reset for your entire outdoor space.
When you clear away spent annuals and any diseased leaves, you're essentially evicting the pests and fungal spores, like powdery mildew, that are looking for a cosy place to overwinter. It's one of the simplest yet most effective bits of garden hygiene you can do, and it can dramatically reduce your problems come spring.
The Three Pillars of Winter Prep
I find it helps to break down winter prep into three core areas. Each one plays a vital role in building a resilient and beautiful garden for the seasons ahead.
- Clean Up: This is your first port of call. It means pulling out dead annuals, cutting back the right perennials (leaving others for winter structure), and having one last go at the weeds. The main goal here is to deny pests and diseases a winter hideout.
- Protect and Insulate: Tender plants, especially those in pots, really need our help to get through the plunging temperatures and biting winds. This is where you’ll be adding a thick layer of mulch, wrapping pots in hessian, or even moving the most vulnerable plants to a more sheltered spot.
- Plan and Enrich: The quiet of winter is the perfect time to give back to your soil. Spreading a good layer of compost or well-rotted manure now allows it months to break down, slowly releasing nutrients and creating a wonderfully rich foundation for spring planting.
To give you a quick overview, here are the essential jobs at a glance.
Winter Garden Preparation At a Glance
This table serves as a handy checklist for the main tasks, but timing can be flexible depending on your local weather.
By tackling these jobs in autumn, you are not just closing down the garden for one season; you are actively laying the groundwork for a more resilient and productive garden the following year.
Knowing what to do and when is the key to it all. For a more detailed look at what jobs to tackle each month, our UK gardening calendar is a great resource to keep you on track. In the next few sections, we'll dive deeper into each of these pillars, giving you practical, actionable advice to get your garden winter-ready with confidence.
Putting Your Garden Beds to Bed for a Healthier Spring

A good autumn clear-up is your garden's best defence against pests and diseases looking for a cosy place to spend the winter. But knowing how to prepare a garden for winter isn’t about stripping everything back to bare earth. It’s more of a strategic edit, making smart choices that benefit your soil, your plants, and even the local wildlife. This is the moment to decide what needs to go and what can stay.
What Should You Clear Out Now?
Start with the easy wins: any annuals that have run their course, like cosmos and sunflowers. Pulling them up stops them from turning into a soggy, rotting mess, which is an open invitation for fungal growth. The same logic applies to any vegetable crops that have given you their last harvest. Clearing the veggie patch not only tidies the plot but also breaks the life cycle of pests that love to hide out in old plant debris.
Next, turn your attention to perennials that are prone to disease. If you’ve battled with powdery mildew on plants like phlox, monarda, or some Michaelmas daisies, it’s best to cut them right back to the ground. This one simple action dramatically cuts down on the fungal spores that will otherwise survive the winter, ready to reinfect your garden come spring.
Clearing away diseased foliage is one of the most effective, non-chemical ways to ensure a healthier garden next year. Think of it as preventative medicine that pays off handsomely, reducing your workload later on.
This is also your last chance for a really effective weed. Getting them out now, roots and all, before they set seed, will save you a world of back-breaking work in the spring. Be ruthless with deep-rooted perennial weeds like dandelions and bindweed – a determined weeding session in autumn is worth three half-hearted ones in April.
What to Leave Behind for Wildlife
While a tidy garden is satisfying, a completely sterile one is a desert for overwintering wildlife. Many plants can provide crucial food and shelter through the coldest months.
Try to leave some of these in place:
- Structural Stems: The beautiful, skeletal forms of ornamental grasses like miscanthus or calamagrostis look incredible with a touch of frost and provide fantastic shelter for insects.
- Seed Heads: Don't be too quick to deadhead everything. The seed heads of plants like echinacea, rudbeckia, and sedum are a natural bird feeder for goldfinches and other small birds.
- Hollow Stems: The hollow stems of certain plants are perfect little hideaways for beneficial insects like lacewings and ladybirds to spend the winter.
The trick is to find that sweet spot between good garden hygiene and creating a supportive ecosystem. By clearing some areas and leaving others, you’re setting your beds up for a brilliant spring while also looking after the natural world.
And if all that clearing has left you with some invitingly empty space in the vegetable patch, why stop now? For some great ideas, check out our guide on autumn vegetables you can grow and keep your harvest going.
Protecting Your Plants From Frost and Cold
When the mild autumn days give way to the first sharp frosts, the focus of winter garden prep shifts from tidying to defence. The UK winter is notoriously unpredictable, throwing everything from gentle frosts to biting, icy winds at us. Giving your plants the right protection now is absolutely crucial if you want to see them again in spring.
For many plants, a little insulation is all it takes. One of the easiest and most effective things you can do is to apply a thick layer of mulch around the base of your borderline-hardy perennials. A generous 10-15cm layer of bark chips, well-rotted compost, or leaf mould acts like a cosy duvet for the roots. It shields them from the worst of the cold and stops the ground from freezing solid around them.
Prioritising Your Most Vulnerable Plants
Not every plant needs to be bundled up. The real trick is to identify which ones in your garden are most at risk so you can put your effort where it’s needed most.
- Borderline-Hardy Perennials: Think of plants like Agapanthus or certain Fuchsias. They will definitely thank you for a deep mulch. For a bit of extra protection, you can even leave their old foliage in place until spring to shield the crown from the elements.
- Tender Shrubs: Prized shrubs like Olive trees or Tree Ferns often need more than just mulch. Wrapping them in horticultural fleece or hessian sacking can be a lifesaver, protecting them from nasty windburn and severe frost.
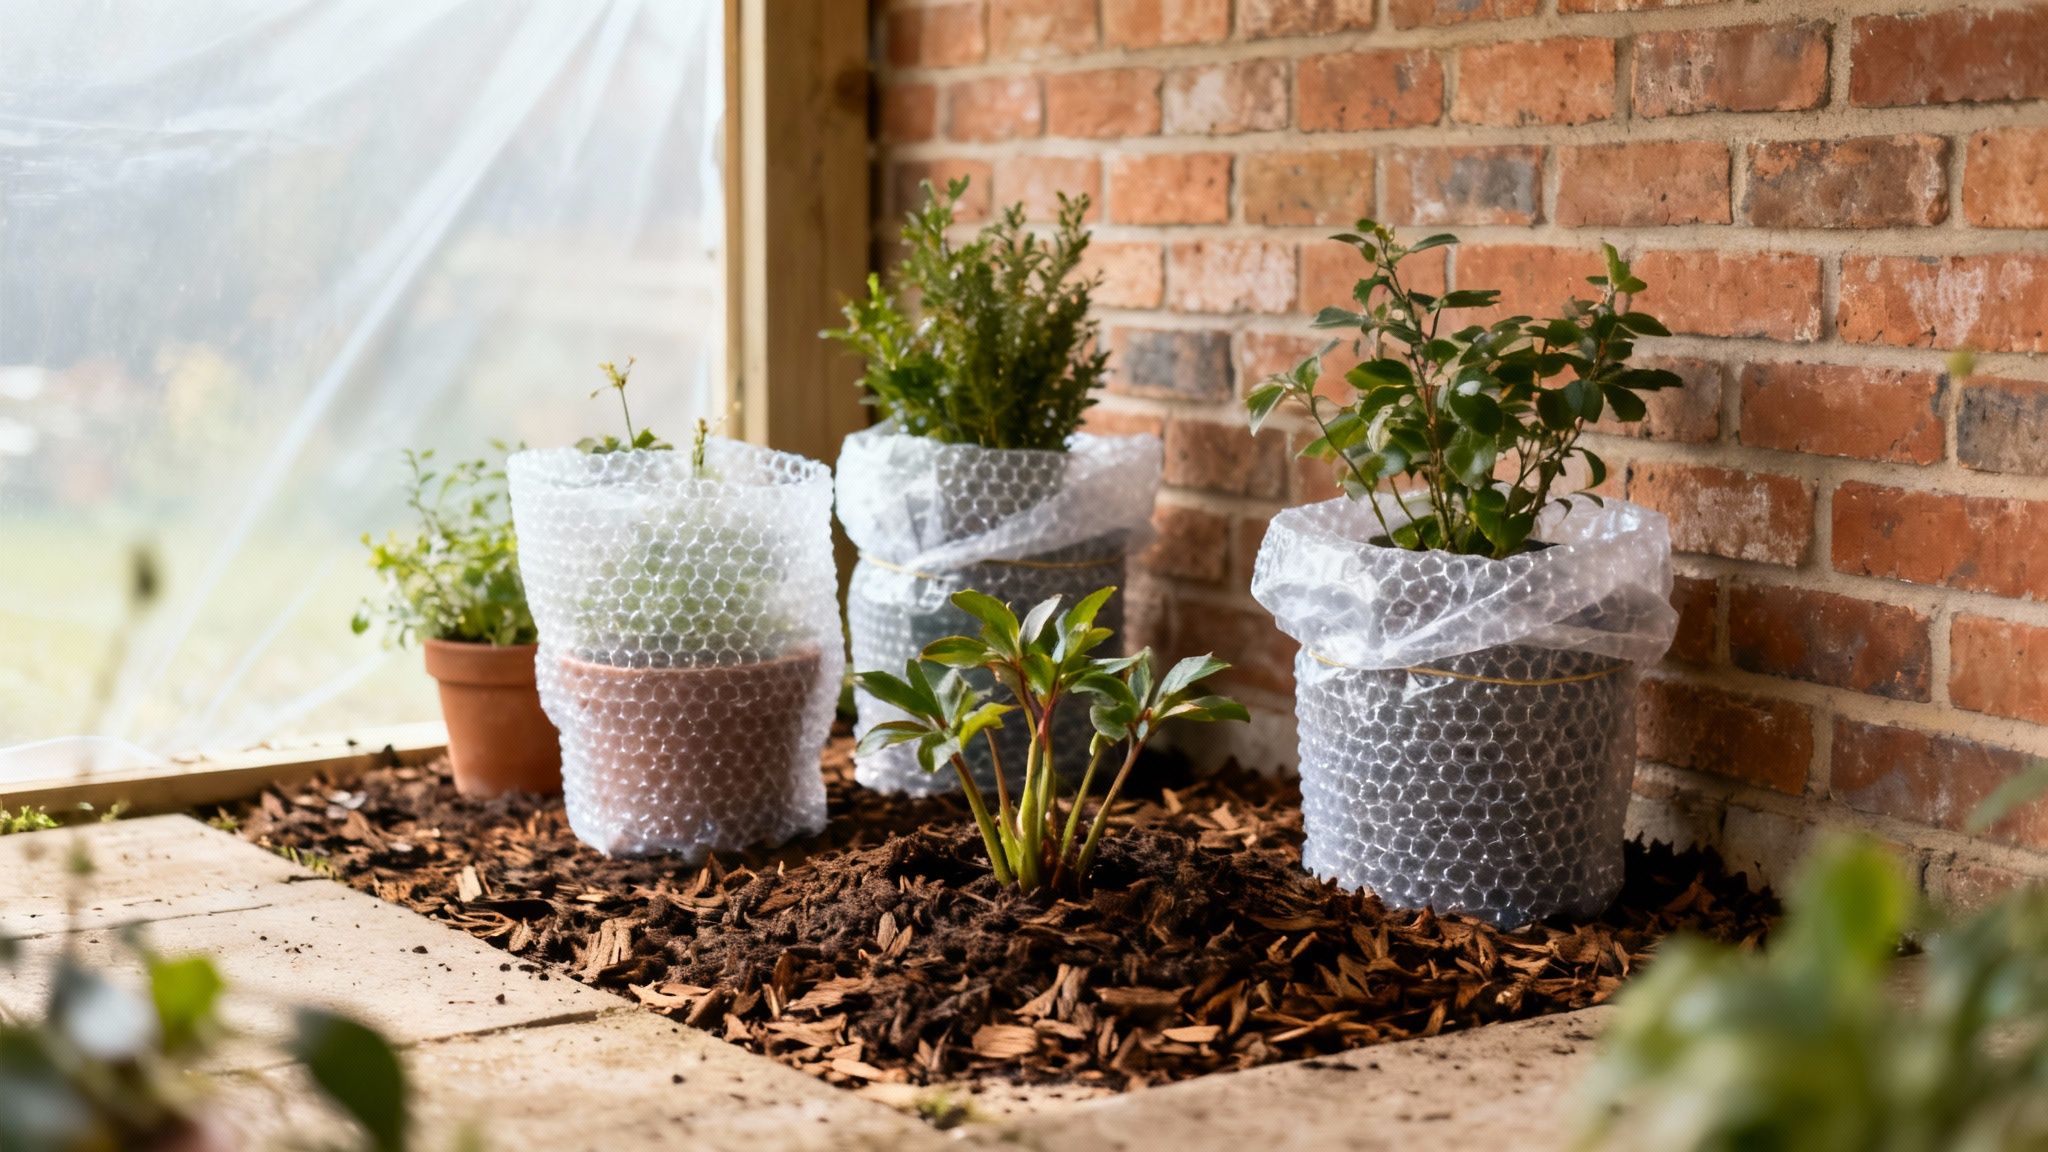
- Container Plants: Anything growing in a pot is far more vulnerable. Its roots are exposed to cold air from all sides, not just from above like plants in the ground.
We saw just how important this protection can be during the harsh winter of 2022–23. At RHS Garden Wisley, temperatures plunged to an almost unheard-of -10°C to -12°C in some frost pockets. This sudden cold snap, coming after a mild autumn, caused widespread plant loss. It was especially tough on container-grown specimens and plants from Australasia, like Hebe and Phormium, that hadn't had a chance to harden off properly.
A Fortress for Your Pots
Container plants really demand special attention as winter closes in. Their roots can freeze solid much more easily than those of plants in the ground, and that often leads to irreversible damage. Luckily, a few simple tactics can make a world of difference.
Try grouping your pots together against a sheltered, south-facing wall. This creates a warmer microclimate as the combined mass helps to retain heat, and the wall offers much-needed protection from the coldest winds. For even better insulation, wrap individual pots in bubble wrap or hessian and secure it with twine. It might not be the prettiest look, but it’s a temporary measure that really works.
Here's an essential tip for winter container gardening: get your pots off the ground. Using 'pot feet' or even just a few bricks allows excess water to drain away freely. This stops the soil from becoming a waterlogged, frozen block that can kill roots and crack expensive terracotta pots.
If you're looking for more detailed strategies on this, our guide on protecting plants in winter has plenty more tips and techniques. By identifying your garden’s frost pockets and giving targeted protection, you’re giving every plant its best possible chance to survive and thrive next year.
Building Richer Soil for Next Year's Garden
As the garden winds down for its winter slumber, it’s easy to think our work is done. But this dormant phase is actually a golden opportunity to invest in your garden’s most valuable asset: the soil itself.
Think of it as feeding the earth that will feed your plants next year. A bit of effort now pays enormous dividends come spring, setting you up for healthier plants and a far more abundant harvest. The simplest and, in my experience, most effective approach is to lay a thick blanket of organic matter over your cleared beds.
This "no-dig" method is a real game-changer. Not only does it save your back from a lot of heavy work, but it also protects the delicate soil structure and the incredible network of beneficial organisms living beneath the surface.
Your Go-To Soil Conditioners
When it comes to choosing what to spread on your beds, it’s less about finding one perfect material and more about using what you have available. Each of these options brings something special to the party.
- Well-Rotted Manure: This is a fantastic source of slow-release nutrients that will gently feed the soil for months on end.
- Homemade Compost: The ultimate in garden recycling, this returns valuable nutrients from your own garden and kitchen waste right back where they belong. If you're tight on space, our guide on composting for small gardens has some brilliant, practical solutions.
- Leaf Mould: Honestly, this stuff is gardener's gold. It's superb for improving soil structure, helping heavy clay soils drain more freely and giving sandy soils a much-needed ability to hold on to moisture.
All you need to do is spread a generous layer, about 5-10cm deep, directly onto the soil. Then, just step back and let nature’s best gardeners—the worms—do all the hard work of pulling it down into the soil for you.
Whatever you do, resist the temptation to dig this material in! By leaving it on the surface, you're mimicking the natural process of a forest floor. This creates a protective mulch that suppresses weeds, insulates the ground, and gradually enriches the soil below.
Planting a Living Mulch
Another brilliant strategy is to plant a "green manure," often called a cover crop. This involves sowing hardy plants like field beans, winter tares, or grazing rye over any empty soil in the autumn. These crops act as a living blanket, achieving several goals at once.
For starters, their roots hold the soil together, preventing your precious topsoil from being washed away by heavy winter rains. Better yet, legumes like field beans have the amazing ability to "fix" nitrogen from the air, storing it in their roots. When you cut the plants down in spring and let them rot on the surface, this captured nitrogen is released—a free and completely natural fertiliser for your next crop.
Given our unpredictable UK winters, building healthy soil is more critical than ever. The Royal Horticultural Society points out that incorporating organic matter is vital for improving drainage, which helps robust winter vegetables like kale and leeks to thrive, especially when waterlogged ground can suffocate plant roots. Good soil structure is your best defence.
Caring for Your Tools and Garden Structures
While most of our focus in autumn is on the plants and soil, carving out a little time for your tools and garden structures is a job you’ll thank yourself for come spring. It’s all too easy to shove a muddy spade back in the shed and forget about it, but that neglect leads to rust, damage, and avoidable trips to the garden centre. Thinking about how to prepare your garden for winter isn’t complete without this essential end-of-season maintenance.
This isn't just about being tidy; it's about protecting your investment. A clean, sharp spade or a well-oiled pair of secateurs makes those first spring tasks a genuine pleasure rather than a battle against your own equipment.
Essential End-of-Season Tool Care
Giving your tools a bit of TLC now is one of the most satisfying jobs of the year. The first step? A proper garden round-up. You'll be amazed how many hand trowels and forks get left behind in the beds during the last rush of harvesting.
Once you’ve gathered everything, it’s a simple three-part process:
- Clean them up: Get a stiff brush and some water to scrub every last bit of caked-on mud from your spades, forks, and hoes. It's the dried-on soil that traps moisture against the metal, and that's exactly what causes rust.
- Sharpen your blades: After a full season of cutting and pruning, the blades on your secateurs, loppers, and shears will be feeling a bit dull. A few passes with a sharpening stone or a dedicated tool sharpener will restore a keen edge. This means cleaner cuts and healthier plants next year.
- Oil and protect: Once everything is clean and sharp, wipe down all the metal parts with an oily rag. A light coating of mineral oil (or even just old engine oil) creates a barrier that repels moisture and stops rust from forming in the damp winter air.
The biggest mistake I see gardeners make is putting tools away damp and dirty. It’s a small oversight, but it’s the number one reason tools rust and wooden handles start to rot. Just five minutes of cleaning can add years to the life of your gear.
With your tools gleaming, it's time to store them properly. A dry, organised space is best. For some inspiration on getting your shed in order, our journal has some brilliant garden tool storage ideas.
Prepping Structures for Winter's Worst
Don't forget the bigger things in your garden. Fences, greenhouses, and sheds take a real beating from winter gales and heavy snow, so a quick health check now can prevent a disaster later.
Take a walk around your garden and look for weak spots. Give fence posts a good shake—if they’re wobbly, they need reinforcing before the first storm hits. Make sure to clear the gutters on sheds and greenhouses, too. Blocked gutters can lead to overflows and water damage you won't spot until it's too late.
Finally, give your greenhouse a good clear-out. Wash all your used pots and seed trays with hot, soapy water. This simple task gets rid of any lingering pests and fungal spores, ensuring your seedlings get a clean, healthy start next spring.
Your Winter Gardening Questions, Answered
Even with the best-laid plans, a few tricky questions always seem to surface when you start putting the garden to bed for winter. Getting some clear, practical answers can be the difference between worrying and acting with confidence. Let's dig into some of the most common queries I hear from UK gardeners and get you ready for the cold months ahead.
Should I Cut Back All My Perennials Before Winter?
This is a classic question, and the answer is a firm "it depends". It's certainly not a one-size-fits-all job. You should absolutely chop back anything showing signs of disease, like mildew on your phlox, to prevent nasty spores from hunkering down for the winter.
However, leaving most of your perennials standing has some fantastic benefits. Learning how to prepare a garden for winter is as much about supporting nature as it is about tidiness. The sturdy, hollow stems of plants like sedums and echinaceas offer crucial shelter for beneficial insects, and their seed heads provide a natural buffet for birds like goldfinches throughout the lean months. Plus, who doesn't love the look of frosted ornamental grasses adding a bit of magic to a winter morning?
My rule of thumb is this: clear away anything that’s turned to a soft, collapsed mush or looks diseased. But for the love of your garden's ecosystem (and its winter beauty), leave the sturdy stems and architectural seed heads standing until late winter or early spring.
Is It Too Late to Plant Spring Bulbs?
It really depends on which bulbs you're holding and what the weather is doing. Tulips are wonderfully laid-back; you can get away with planting them as late as December. They actually need that prolonged chill to kickstart their flowering process, so you're doing them a favour.
Daffodils and crocuses, on the other hand, are a bit more eager. Ideally, they need to be in the ground by October or early November to give them enough time to grow a decent root system before the soil freezes solid. But what if you find a forgotten bag of bulbs in the shed? Pop them in the ground anyway! You might get a slightly later or less spectacular show, but it’s always better than letting them shrivel up. Just be sure the ground isn't frozen solid or a complete bog when you plant.
How Do I Protect My Container Plants From Freezing?
Plants in pots are much more susceptible to the cold than those in the ground because their roots are exposed all around. The first thing to check is that you’re using frost-proof pots. Standard terracotta is notorious for cracking when water inside it freezes and expands.
To give the plant itself a fighting chance, group smaller pots together in a sheltered spot, perhaps tucked against the house or in a cold frame. For those big, heavy pots you can't possibly move, wrap the container in a thick layer of bubble wrap or hessian sacking for a bit of insulation. Most importantly, get them off the cold, wet ground. Popping them on 'pot feet' or a few bricks allows for proper drainage and stops the roots from sitting in an icy puddle, which is a one-way ticket to root rot.
What Is the Best Way to Improve My Soil Over Winter?
Winter offers a fantastic, low-effort opportunity to give your soil a serious boost. Once your veg patch or annual borders are cleared, all you need to do is spread a thick layer (5-10cm) of organic matter right on top.
You can use well-rotted manure, your own garden compost, or lovely, crumbly leaf mould. Resist the urge to dig it in! Just leave it on the surface as a mulch. The worms and the rest of the soil's microscopic workforce will do all the heavy lifting for you, dragging the goodness down over winter. Come spring, you’ll pull back the mulch to find beautifully structured, fertile soil, all ready for the new season.